Saturday, April 27, 2013

Breakout game in Qt4

In this part of the Qt4 C++ programming tutorial we will create a simple Breakout game clone.
The Breakout is an arcade game developed by Atari Inc. The game was created in 1976. In this game, the player moves a paddle on the screen and bounces a ball/balls. The objective is to destroy bricks in the top of the window.

The development

In our game, we have one paddle, one ball and 30 bricks. I have created an image for a ball, paddle and a brick in Inkscape. We use a timer to create a game cycle. We do not work with angles, we simply change directions. Top, bottom, left and right. I was inspired by the pybreakout game. It was developed in PyGame library by Nathan Dawson.
The game is intentionally simple. There are no bonuses, levels, score. So that it is easier to understand.
The Qt4 C++ programming library is developed for creating computer applications. Nevertheless, it can be used to create games as well. Developing a computer game is a great way to learn the Qt4 programming library.
paddle.h
#ifndef PADDLE_H
#define PADDLE_H

#include <QImage>
#include <QRect>

class Paddle
{

  public:
    Paddle();
    ~Paddle();

  public:
    void resetState();
    void moveLeft(int);
    void moveRight(int);
    QRect getRect();
    QImage & getImage();

  private:
    QImage image;
    QRect rect;

};

#endif
This is a header file for the paddle object.
paddle.cpp
#include "paddle.h"
#include <iostream>

Paddle::Paddle()
{
  image.load("paddle.png");

  rect = image.rect();
  resetState();
}

Paddle::~Paddle()
{
 std::cout << ("Paddle deleted\n");
}

void Paddle::moveLeft(int left)
{
  if (rect.left() >= 2)
    rect.moveTo(left, rect.top());
}

void Paddle::moveRight(int right)
{
  if (rect.right() <= 298)
    rect.moveTo(right, rect.top());
}

void Paddle::resetState()
{
  rect.moveTo(200, 360);
}

QRect Paddle::getRect()
{
  return rect;
}

QImage & Paddle::getImage()
{
  return image;
}
The paddle can be moved to the right or to the left.
Paddle::Paddle()
{
  image.load("paddle.png");

  rect = image.rect();
  resetState();
}
In the constructor, we load our paddle image. Get the image rectangle and move the image to it's starting position.
void Paddle::moveLeft(int left)
{
  if (rect.left() >= 2)
    rect.moveTo(left, rect.top());
}
The moveLeft() method moves the rectangle to the left.
brick.h
#ifndef BRICK_H
#define BRICK_H

#include <QImage>
#include <QRect>

class Brick
{

  public:
    Brick(int, int);
    ~Brick();

  public:
    void resetState();
    bool isDestroyed();
    void setDestroyed(bool);
    QRect getRect();
    void setRect(QRect);
    QImage & getImage();

  private:
    QImage image;
    QRect rect;
    int position;
    bool destroyed;

};

#endif
This is the header file for the brick object.
brick.cpp
#include "brick.h"
#include <iostream>

Brick::Brick(int x, int y) 
{
  image.load("brick.png");
  destroyed = FALSE;
  rect = image.rect();
  rect.translate(x, y);
}

Brick::~Brick() {

   std::cout << ("Brick deleted\n");
}

QRect Brick::getRect()
{
  return rect;
}

void Brick::setRect(QRect rct)
{
  rect = rct;
}

QImage & Brick::getImage()
{
  return image;
}

bool Brick::isDestroyed()
{
  return destroyed;
}

void Brick::setDestroyed(bool destr)
{
  destroyed = destr;
}
bool Brick::isDestroyed()
{
  return destroyed;
}
The brick has a destroyed flag. If the destroyed flag is set, the brick is not drawn on the window.
ball.h
#ifndef BALL_H
#define BALL_H

#include <QImage>
#include <QRect>

class Ball
{

  public:
    Ball();
    ~Ball();

  public:
    void resetState();
    void moveBottom(int);
    void moveTop(int);
    void moveLeft(int);
    void moveRight(int);
    void autoMove();
    void setXDir(int);
    void setYDir(int);
    int getXDir();
    int getYDir();
    QRect getRect();
    QImage & getImage();

  private:
    int angle;
    int speed;
    int xdir;
    int ydir;
    bool stuck;
    QImage image;
    QRect rect;

};

#endif
The header file for the ball object.
ball.cpp
#include "ball.h"
#include <iostream>

Ball::Ball()
{

  xdir = 1;
  ydir = -1;

  image.load("ball.png");

  rect = image.rect();
  resetState();

}

Ball::~Ball() {
  std::cout << ("Ball deleted\n");
}


void Ball::autoMove()
{
  rect.translate(xdir, ydir);

  if (rect.left() == 0) {
    xdir = 1;
  }

  if (rect.right() == 300) {
    xdir = -1;
  }

  if (rect.top() == 0) {
    ydir = 1;
  }
}

void Ball::resetState() 
{
  rect.moveTo(230, 355);
}

void Ball::moveBottom(int bottom)
{
  rect.moveBottom(bottom);
}

void Ball::moveTop(int top)
{
  rect.moveTop(top);
}

void Ball::moveLeft(int left)
{
  rect.moveLeft(left);
}

void Ball::moveRight(int right)
{
  rect.moveRight(right);
}

void Ball::setXDir(int x)
{
  xdir = x;
}

void Ball::setYDir(int y)
{
  ydir = y;
}

int Ball::getXDir()
{
  return xdir;
}

int Ball::getYDir()
{
  return ydir;
}

QRect Ball::getRect()
{
  return rect;
}

QImage & Ball::getImage()
{
  return image;
}
The autoMove() method is called each game cycle to move the ball on the screen. If it hists the boudaries, the ball direction changes.
breakout.h
#ifndef BREAKOUT_H
#define BREAKOUT_H

#include "ball.h"
#include "brick.h"
#include "paddle.h"
#include <QWidget>
#include <QKeyEvent>

class Breakout : public QWidget
{
  Q_OBJECT

  public:
    Breakout(QWidget *parent = 0);
    ~Breakout();

  protected:
    void paintEvent(QPaintEvent *event);
    void timerEvent(QTimerEvent *event);
    void keyPressEvent(QKeyEvent *event);

    void startGame();
    void pauseGame();
    void stopGame();
    void victory();
    void checkCollision();

  private:
    int x;
    int timerId;
    Ball *ball;
    Paddle *paddle;
    Brick * bricks[30];
    bool gameOver;
    bool gameWon;
    bool gameStarted;
    bool paused;

};

#endif
This is the header file for the breakout object.
 int x;
 int timerId;
The x value stores the current x position of the paddle. The timerId is used for identifying of the timer object. This is necessary, when we pause the game.
breakout.cpp
#include "breakout.h"
#include <QPainter>
#include <QApplication>

Breakout::Breakout(QWidget *parent)
    : QWidget(parent)
{

  x = 0;
  gameOver = FALSE;
  gameWon = FALSE;
  paused = FALSE;
  gameStarted = FALSE;
  ball = new Ball();
  paddle = new Paddle();


  int k = 0;
  for (int i=0; i<5; i++) {
    for (int j=0; j<6; j++) {
      bricks[k] = new Brick(j*40+30, i*10+50);
      k++; 
    }
  }
}

Breakout::~Breakout() {
 delete ball;
 delete paddle;
 for (int i=0; i<30; i++) {
   delete bricks[i];
 }
}

void Breakout::paintEvent(QPaintEvent *event)
{
  QPainter painter(this);

  if (gameOver) {
    QFont font("Courier", 15, QFont::DemiBold);
    QFontMetrics fm(font);
    int textWidth = fm.width("Game Over");

    painter.setFont(font);
    int h = height();
    int w = width();

    painter.translate(QPoint(w/2, h/2));
    painter.drawText(-textWidth/2, 0, "Game Over");
  }
  else if(gameWon) {
    QFont font("Courier", 15, QFont::DemiBold);
    QFontMetrics fm(font);
    int textWidth = fm.width("Victory");

    painter.setFont(font);
    int h = height();
    int w = width();

    painter.translate(QPoint(w/2, h/2));
    painter.drawText(-textWidth/2, 0, "Victory");
  }
  else {
    painter.drawImage(ball->getRect(), 
        ball->getImage());
    painter.drawImage(paddle->getRect(), 
        paddle->getImage());

    for (int i=0; i<30; i++) {
        if (!bricks[i]->isDestroyed()) 
          painter.drawImage(bricks[i]->getRect(), 
              bricks[i]->getImage());
    }
  }
}

void Breakout::timerEvent(QTimerEvent *event)
{
  ball->autoMove();
  checkCollision();
  repaint();
}


void Breakout::keyPressEvent(QKeyEvent *event)
{
    switch (event->key()) {
    case Qt::Key_Left:
       {  
         int x = paddle->getRect().x();
        for (int i=1; i<=5; i++)
          paddle->moveLeft(x--);
        break;
       }
    case Qt::Key_Right:
        { 
          int x = paddle->getRect().x();
          for (int i=1; i<=5; i++)
            paddle->moveRight(x++);
        }
        break;
    case Qt::Key_P:
        { 
          pauseGame();
        }
        break;
    case Qt::Key_Space:
        {
          startGame();
        }
        break;
    case Qt::Key_Escape:
        {
          qApp->exit();
        }
        break;
    default:
        QWidget::keyPressEvent(event);
    }
}

void Breakout::startGame()
{ 
  if (!gameStarted) {
    ball->resetState();
    paddle->resetState();

    for (int i=0; i<30; i++) {
      bricks[i]->setDestroyed(FALSE);
    }
    gameOver = FALSE; 
    gameWon = FALSE; 
    gameStarted = TRUE;
    timerId = startTimer(10);  
  }
}

void Breakout::pauseGame()
{
  if (paused) {
    timerId = startTimer(10);
    paused = FALSE;
  } else {
    paused = TRUE;
    killTimer(timerId); 
   }
}

void Breakout::stopGame()
{
  killTimer(timerId);    
  gameOver = TRUE;      
  gameStarted = FALSE;
}

void Breakout::victory()
{
  killTimer(timerId);
  gameWon = TRUE;  
  gameStarted = FALSE;
}

void Breakout::checkCollision()
{

  if (ball->getRect().bottom() > 400)
    stopGame(); 

  for (int i=0, j=0; i<30; i++) {
    if (bricks[i]->isDestroyed()) {
      j++;
    }
    if (j==30) 
      victory();
  }

  if ((ball->getRect()).intersects(paddle->getRect())) {

    int paddleLPos = paddle->getRect().left();  
    int ballLPos = ball->getRect().left();   

    int first = paddleLPos + 8;
    int second = paddleLPos + 16;
    int third = paddleLPos + 24;
    int fourth = paddleLPos + 32;

    if (ballLPos < first) {
      ball->setXDir(-1);
      ball->setYDir(-1);
    }

    if (ballLPos >= first && ballLPos < second) {
      ball->setXDir(-1);
      ball->setYDir(-1*ball->getYDir());
    }

    if (ballLPos >= second && ballLPos < third) {
       ball->setXDir(0);
       ball->setYDir(-1);
    }

    if (ballLPos >= third && ballLPos < fourth) {
       ball->setXDir(1);
       ball->setYDir(-1*ball->getYDir());
    }

    if (ballLPos > fourth) {
      ball->setXDir(1);
      ball->setYDir(-1);
    }
  }


  for (int i=0; i<30; i++) {
    if ((ball->getRect()).intersects(bricks[i]->getRect())) {

      int ballLeft = ball->getRect().left();  
      int ballHeight = ball->getRect().height(); 
      int ballWidth = ball->getRect().width();
      int ballTop = ball->getRect().top();  

      QPoint pointRight(ballLeft + ballWidth + 1, ballTop);
      QPoint pointLeft(ballLeft - 1, ballTop);  
      QPoint pointTop(ballLeft, ballTop -1);
      QPoint pointBottom(ballLeft, ballTop + ballHeight + 1);  

      if (!bricks[i]->isDestroyed()) {
        if(bricks[i]->getRect().contains(pointRight)) {
           ball->setXDir(-1);
        } 

        else if(bricks[i]->getRect().contains(pointLeft)) {
           ball->setXDir(1);
        } 

        if(bricks[i]->getRect().contains(pointTop)) {
           ball->setYDir(1);
        } 

        else if(bricks[i]->getRect().contains(pointBottom)) {
           ball->setYDir(-1);
        } 

        bricks[i]->setDestroyed(TRUE);
      }
    }
  }

}
Here is the game logic.
 int k = 0;
 for (int i=0; i<5; i++) {
   for (int j=0; j<6; j++) {
     bricks[k] = new Brick(j*40+30, i*10+50);
     k++; 
   }
 }
In the constructor of the Breakout object, we create 30 bricks.
 painter.drawImage(ball->getRect(), 
     ball->getImage());
 painter.drawImage(paddle->getRect(), 
     paddle->getImage());

 for (int i=0; i<30; i++) {
     if (!bricks[i]->isDestroyed()) 
       painter.drawImage(bricks[i]->getRect(), 
           bricks[i]->getImage());
 }
If the game is not won or lost, we draw the ball, paddle and the bricks in the paintEvent().
void Breakout::timerEvent(QTimerEvent *event)
{
  ball->autoMove();
  checkCollision();
  repaint();
}
In the timerEvent(), we move the ball, check if the ball collided with the paddle or a brick and generate a paint event.
 case Qt::Key_Left:
    {  
      int x = paddle->getRect().x();
     for (int i=1; i<=5; i++)
       paddle->moveLeft(x--);
     break;
    }
If we press the left cursor key, we call the moveLeft() method of the paddle object. We call the method five times, so that the movement is smooth.
void Breakout::stopGame()
{
  killTimer(timerId);    
  gameOver = TRUE;      
  gameStarted = FALSE;
}
In the stopGame() method, we kill the timer and set the appropriate flags.
 if (ball->getRect().bottom() > 400)
   stopGame(); 
If the ball hits the bottom, we stop the game.
 for (int i=0, j=0; i<30; i++) {
   if (bricks[i]->isDestroyed()) {
     j++;
   }
   if (j==30) 
     victory();
 }
We check how many bricks are destroyed. If we destroyed all 30 bricks, we win the game.
 if (ballLPos < first) {
   ball->setXDir(-1);
   ball->setYDir(-1);
 }
If the ball hits the first part of the paddle, we change the direction of the ball to north east.
 if(bricks[i]->getRect().contains(pointTop)) {
   ball->setYDir(1);
 }
If the ball hits the bottom of the brick, we change the y direction of the ball. It goes down.
main.cpp
#include "breakout.h"
#include <QDesktopWidget>
#include <QApplication>

void center(QWidget &widget)
{
  int x, y;
  int screenWidth;
  int screenHeight;

  int WIDTH = 300;
  int HEIGHT = 400;
  

  QDesktopWidget *desktop = QApplication::desktop();

  screenWidth = desktop->width();
  screenHeight = desktop->height();
 
  x = (screenWidth - WIDTH) / 2;
  y = (screenHeight - HEIGHT) / 2;

  widget.setGeometry(x, y, WIDTH, HEIGHT);
  widget.setFixedSize(WIDTH, HEIGHT);
}


int main(int argc, char *argv[])
{
  QApplication app(argc, argv);  
    
  Breakout window;
  
  window.setWindowTitle("Breakout");
  window.show();
  center(window);

  return app.exec();
}
Main file.
The Breakout game
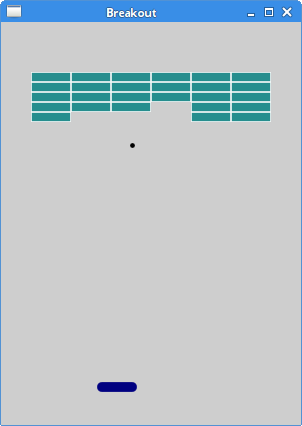
Figure: The Breakout game
So this was the Breakout game in C++ and Qt4 library.

Custom widget in Qt4

In this part of the Qt4 C++ programming tutorial, we will create a custom widget.
Most toolkits usually provide only the most common widgets like buttons, text widgets, sliders etc. No toolkit can provide all possible widgets. Programmers must create such widgets by themselves. They do it by using the drawing tools provided by the toolkit. There are two possibilities. A programmer can modify or enhance an existing widget. Or he can create a custom widget from scratch.

The Burning widget

In the next example we will create a custom burning widget. This widget can be seen in applications like Nero or K3B. The widget will be created from scratch.
burning.h
#pragma once

#include <QWidget>
#include <QSlider>
#include <QFrame>
#include "widget.h"

class Burning : public QFrame
{
  Q_OBJECT  

  public:
    Burning(QWidget *parent = 0);
    int getCurrentWidth();
    
  public slots:
    void valueChanged(int);
    
  private:
    QSlider *slider;
    Widget *widget;
    int cur_width;
    
    void initUI();
};
This is the header file of the main window of the example.
public:
  Burning(QWidget *parent = 0);
  int getCurrentWidth();
The getCurrentWidth() method is going to be used to determine the slider value.
private:
  QSlider *slider;
  Widget *widget;
  int cur_width;
    
  void initUI();
We will have two widgets on the client area of the window. A predefined slider and a custom widget. The cur_width variable will hold the current value from the slider. This value is used when painting the custom widget.
burning.cpp
#include <QtGui>
#include "burning.h"

Burning::Burning(QWidget *parent)
    : QFrame(parent)
{   
  initUI();
}

void Burning::initUI()
{
  const int MAX_VALUE = 750; 
  cur_width = 0; 
  
  slider = new QSlider(Qt::Horizontal , this); 
  slider->setMaximum(MAX_VALUE);
  slider->setGeometry(50, 50, 130, 30);

  connect(slider, SIGNAL(valueChanged(int)), 
          this, SLOT(valueChanged(int)));
  
  QVBoxLayout *vbox = new QVBoxLayout(this);
  QHBoxLayout *hbox = new QHBoxLayout();

  vbox->addStretch(1);

  widget = new Widget(this);  
  hbox->addWidget(widget, 0);

  vbox->addLayout(hbox);

  setLayout(vbox);    
}

void Burning::valueChanged(int val) 
{
  cur_width = val;
  widget->repaint();
}

int Burning::getCurrentWidth() 
{
  return cur_width;
}
Here we build the main window of the example.
connect(slider, SIGNAL(valueChanged(int)), 
        this, SLOT(valueChanged(int)));
When we move the slider, the valueChanged() slot is executed.
void Burning::valueChanged(int val) 
{
  cur_width = val;
  widget->repaint();
}
When we change the value of the slider, we store the new value and repaint the custom widget.
widget.h
#pragma once

#include <QFrame>

class Burning;

class Widget : public QFrame
{
  Q_OBJECT  

  public:
    Widget(QWidget *parent = 0);

  protected:
    void paintEvent(QPaintEvent *e);
    void drawWidget(QPainter &qp);

  private:
    QWidget *m_parent;
    Burning *burn;
};
This is the header file of the custom burning widget.
private:
  QWidget *m_parent;
  Burning *burn;
We store a pointer to the parent widget. We get the cur_width through this pointer.
widget.cpp
#include <QtGui>

#include "widget.h"
#include "burning.h"

const int PANEL_HEIGHT = 30;

Widget::Widget(QWidget *parent)
    : QFrame(parent)
{
  m_parent = parent;
  setMinimumHeight(PANEL_HEIGHT);
}

void Widget::paintEvent(QPaintEvent *e)
{       
  QPainter qp(this);
  drawWidget(qp);
  
  QFrame::paintEvent(e);  
}

void Widget::drawWidget(QPainter &qp)
{  
  const int DISTANCE = 19;
  const int LINE_WIDTH = 5;
  const int DIVISIONS = 10;
  const float FULL_CAPACITY = 700;
  const float MAX_CAPACITY = 750;    
  
  QString num[] = { "75", "150", "225", "300", "375", "450", 
    "525", "600", "675" };
  int asize = sizeof(num)/sizeof(num[1]); 
  
  QColor redColor(255, 175, 175);
  QColor yellowColor(255, 255, 184);  
  
  int width = size().width();

  Burning *burn = (Burning *) m_parent;
  int cur_width = burn->getCurrentWidth();

  int step = (int) qRound(width / DIVISIONS);
  int till = (int) ((width / MAX_CAPACITY) * cur_width);
  int full = (int) ((width / MAX_CAPACITY) * FULL_CAPACITY);

  if (cur_width >= FULL_CAPACITY) 
  {
    qp.setPen(yellowColor); 
    qp.setBrush(yellowColor);
    qp.drawRect(0, 0, full, 30);
    qp.setPen(redColor);
    qp.setBrush(redColor);
    qp.drawRect(full, 0, till-full, PANEL_HEIGHT);

  } else if (till > 0)
  { 
    qp.setPen(yellowColor);
    qp.setBrush(yellowColor);
    qp.drawRect(0, 0, till, PANEL_HEIGHT);
  }

  QColor grayColor(90, 80, 60);
  qp.setPen(grayColor);
  
  for (int i=1; i <=asize; i++) 
  {
    qp.drawLine(i*step, 0, i*step, LINE_WIDTH);
    QFont newFont = font();
    newFont.setPointSize(7);
    setFont(newFont);

    QFontMetrics metrics(font());

    int w = metrics.width(num[i-1]);
    qp.drawText(i*step-w/2, DISTANCE, num[i-1]);
  }
}
Here we paint the custom widget. We paint the rectangle, vertical lines and the numbers.
void Widget::paintEvent(QPaintEvent *e)
{       
  QPainter qp(this);
  drawWidget(qp);
  
  QFrame::paintEvent(e);  
}
The drawing of the custom widget is delegated to the drawWidget() method.
const int DISTANCE = 19;
const int LINE_WIDTH = 5;
const int DIVISIONS = 10;
const float FULL_CAPACITY = 700;
const float MAX_CAPACITY = 750;   
These are important constants. The DISTANCE is the distance of the numbers on the scale from the top of their parent border. The LINE_WIDTH is the vertical line width. The DIVISIONS is the number of parts of the scale. The FULL_CAPACITY is the capacity of the media. After it is reached, overburning happens. This is visualized by a red colour. The MAX_CAPACITY is the maximum capacity of a medium.
QString num[] = { "75", "150", "225", "300", "375", "450", 
  "525", "600", "675" }; 
We use these numbers to build the scale of the Burning widget.
int width = size().width(); 
We get the width of the widget. The width of the custom widget is dynamic. It can be resized by a user.
Burning *burn = (Burning *) m_parent;
int cur_width = burn->getCurrentWidth();
We get the cur_width value.
int till = (int) ((width / MAX_CAPACITY) * cur_width);
int full = (int) ((width / MAX_CAPACITY) * FULL_CAPACITY); 
We use the width variable to do the transformations. Between the values of the scale and the custom widget's measures.
qp.setPen(redColor);
qp.setBrush(redColor);
qp.drawRect(full, 0, till-full, PANEL_HEIGHT); 
These three lines draw the red rectangle, indicating the overburning.
qp.drawLine(i*step, 0, i*step, LINE_WIDTH); 
Here we draw the small vertical lines.
QFontMetrics metrics(font());

int w = metrics.width(num[i-1]);
qp.drawText(i*step-w/2, DISTANCE, num[i-1]);
Here we draw the numbers of the scale. To precisely position the numbers, we must get the width of the string.
main.cpp
#include <QApplication>
#include "burning.h"

int main(int argc, char *argv[])
{
  QApplication app(argc, argv);
  Burning window;

  window.resize(370, 200);
  window.move(300, 300);
  window.setWindowTitle("The Burning widget");
  window.show();

  return app.exec();
}
This is the main file.
The Burning widget
Figure: The Burning widget
In this part of the Qt4 tutorial, we have created a custom Burning widget.

Painting in Qt4

In this part of the Qt4 C++ programming tutorial we will do some painting.
The QPainter class is instrumental when we do some painting in Qt4. The painting is done with the QPainter class in a reaction to the paintEvent() method.

Lines

In the first example we will paint some lines on the client area of the window.
lines.h
#pragma once

#include <QWidget>

class Lines : public QWidget
{
  Q_OBJECT  

  public:
    Lines(QWidget *parent = 0);

  protected:
    void paintEvent(QPaintEvent *event);
    void drawLines(QPainter *qp);

};
The header file.
lines.cpp
#include "lines.h"
#include <QPainter>


Lines::Lines(QWidget *parent)
    : QWidget(parent)
{

}

void Lines::paintEvent(QPaintEvent *e)
{
  Q_UNUSED(e);
  QPainter qp(this);
  drawLines(&qp);
}

void Lines::drawLines(QPainter *qp)
{  
  QPen pen(Qt::black, 2, Qt::SolidLine);  
  qp->setPen(pen);
  qp->drawLine(20, 40, 250, 40);

  pen.setStyle(Qt::DashLine);
  qp->setPen(pen);
  qp->drawLine(20, 80, 250, 80);

  pen.setStyle(Qt::DashDotLine);
  qp->setPen(pen);
  qp->drawLine(20, 120, 250, 120);

  pen.setStyle(Qt::DotLine);
  qp->setPen(pen);
  qp->drawLine(20, 160, 250, 160);

  pen.setStyle(Qt::DashDotDotLine);
  qp->setPen(pen);
  qp->drawLine(20, 200, 250, 200);

  QVector<qreal> dashes;
  qreal space = 4;

  dashes << 1 << space << 5 << space;

  pen.setStyle(Qt::CustomDashLine);
  pen.setDashPattern(dashes);
  qp->setPen(pen);
  qp->drawLine(20, 240, 250, 240);
}
We paint six different lines on the window.
void Lines::paintEvent(QPaintEvent *e)
{
  Q_UNUSED(e);
  QPainter qp(this);
  drawLines(&qp);
}
The paintEvent() is called when a widget is updated. It is where we create the QPainter object and do the drawing. Since we do not utilize the QPaintEvent object, we suppress the compiler warning with the Q_UNUSED macro. The real drawing is delegated to the drawLines() method.
QPen pen(Qt::black, 2, Qt::SolidLine);
qp->setPen(pen);
We create a QPen object. The pen is solid, 2px thick and of black colour. The pen is used to draw lines and outlines of shapes. The pen is set to the painter object.
qp->drawLine(20, 40, 250, 40);
Here we paint the first line. The four parameters are coordinates of two points on the window.
pen.setStyle(Qt::DashLine);
This code line sets a different pen style.
main.cpp
#include "lines.h"
#include <QApplication>

int main(int argc, char *argv[])
{
  QApplication app(argc, argv);  
    
  Lines window;
  
  window.resize(280, 270);
  window.move(300, 300);
  window.setWindowTitle("Lines");
  window.show();

  return app.exec();
}
Main file.
Lines
Figure: Lines

Colours

A colour is an object representing a combination of Red, Green, and Blue (RGB) intensity values. Valid RGB values are in the range 0 to 255. In the following example, we draw 9 rectangles filled with 9 different colours.
colors.h
#pragma once

#include <QWidget>

class Colors : public QWidget
{
  public:
    Colors(QWidget *parent = 0);

  protected:
    void paintEvent(QPaintEvent *event);

};

Header file.
colors.cpp
#include "colors.h"
#include <QPainter>

Colors::Colors(QWidget *parent)
    : QWidget(parent)
{

}

void Colors::paintEvent(QPaintEvent *e)
{
  Q_UNUSED(e);
  
  QPainter painter(this);
  painter.setPen(QColor("#d4d4d4"));

  painter.setBrush(QBrush("#c56c00"));
  painter.drawRect(10, 15, 90, 60);

  painter.setBrush(QBrush("#1ac500"));
  painter.drawRect(130, 15, 90, 60);

  painter.setBrush(QBrush("#539e47"));
  painter.drawRect(250, 15, 90, 60);

  painter.setBrush(QBrush("#004fc5"));
  painter.drawRect(10, 105, 90, 60);

  painter.setBrush(QBrush("#c50024"));
  painter.drawRect(130, 105, 90, 60);

  painter.setBrush(QBrush("#9e4757"));
  painter.drawRect(250, 105, 90, 60);

  painter.setBrush(QBrush("#5f3b00"));
  painter.drawRect(10, 195, 90, 60);

  painter.setBrush(QBrush("#4c4c4c"));
  painter.drawRect(130, 195, 90, 60);

  painter.setBrush(QBrush("#785f36"));
  painter.drawRect(250, 195, 90, 60);
}
We draw nine rectangles with different color fills. The outline of the rectangles is gray.
painter.setBrush(QBrush("#c56c00"));
painter.drawRect(10, 15, 90, 60);
The QBrush class defines the fill pattern of shapes drawn by QPainter. The drawRect() method draws the rectangle. It draws a rectangle with upper left corner at x, y point and with the given width and height. We used a hexadecimal notation to specify a colour value.
main.cpp
#include "colors.h"
#include <QApplication>

int main(int argc, char *argv[])
{
  QApplication app(argc, argv);

  Colors window;

  window.resize(350, 280);
  window.move(300, 300);
  window.setWindowTitle("Colours");
  window.show();
  
  return app.exec();
}
Main file.
Colors
Figure: Colors

Patterns

The following programming code example is similar to the previous one. This time we fill the rectangles with various predefined patterns.
brushes.h
#pragma once

#include <QWidget>

class Brushes : public QWidget
{
  Q_OBJECT  

  public:
    Brushes(QWidget *parent = 0);

  protected:
    void paintEvent(QPaintEvent *event);

};
Header file.
brushes.cpp
#include "brushes.h"
#include <QApplication>
#include <QPainter>


Brushes::Brushes(QWidget *parent)
    : QWidget(parent)
{

}

void Brushes::paintEvent(QPaintEvent *e)
{
  Q_UNUSED(e);
    
  QPainter painter(this);
  painter.setPen(Qt::NoPen);

  painter.setBrush(Qt::HorPattern);
  painter.drawRect(10, 15, 90, 60);

  painter.setBrush(Qt::VerPattern);
  painter.drawRect(130, 15, 90, 60);

  painter.setBrush(Qt::CrossPattern);
  painter.drawRect(250, 15, 90, 60);

  painter.setBrush(Qt::Dense7Pattern);
  painter.drawRect(10, 105, 90, 60);

  painter.setBrush(Qt::Dense6Pattern);
  painter.drawRect(130, 105, 90, 60);

  painter.setBrush(Qt::Dense5Pattern);
  painter.drawRect(250, 105, 90, 60);

  painter.setBrush(Qt::BDiagPattern);
  painter.drawRect(10, 195, 90, 60);

  painter.setBrush(Qt::FDiagPattern);
  painter.drawRect(130, 195, 90, 60);

  painter.setBrush(Qt::DiagCrossPattern);
  painter.drawRect(250, 195, 90, 60);

}
We draw 9 rectangles with various brush patterns.
painter.setBrush(Qt::HorPattern);
painter.drawRect(10, 15, 90, 60);
We draw a rectangle with a specific pattern. The Qt::HorPattern is a constant used to create a pattern of horizontal lines.
main.cpp
#include "brushes.h"
#include <QApplication>

int main(int argc, char *argv[])
{
  QApplication app(argc, argv); 

  Brushes window;
  
  window.resize(350, 280);
  window.move(300, 300);    
  window.setWindowTitle("Brushes");
  window.show();
  
  return app.exec();
}
Main file.
Patterns
Figure: Patterns

Donut

In the following example, we will create a donut shape.
donut.h
#pragma once

#include <QWidget>

class Donut : public QWidget
{
  Q_OBJECT   

  public:
    Donut(QWidget *parent = 0);

  protected:
    void paintEvent(QPaintEvent *event);

};
Header file.
donut.cpp
#include "donut.h"
#include <QApplication>
#include <QPainter>


Donut::Donut(QWidget *parent)
    : QWidget(parent)
{

}

void Donut::paintEvent(QPaintEvent *e)
{
  Q_UNUSED(e);
  
  QPainter painter(this);

  painter.setPen(QPen(QBrush("#535353"), 0.5));
  painter.setRenderHint(QPainter::Antialiasing);

  int h = height();
  int w = width();

  painter.translate(QPoint(w/2, h/2));

  for (qreal rot=0; rot < 360.0; rot+=5.0 ) {
      painter.drawEllipse(-125, -40, 250, 80);
      painter.rotate(5.0);
  }
}
The "Donut" is an advanced geometrical shape resembling this kind of food. We create it by drawing 72 rotated ellipses.
painter.setRenderHint(QPainter::Antialiasing);
We will paint in antialiased mode. The rendering will be of higher quality.
int h = height();
int w = width();

painter.translate(QPoint(w/2, h/2));
These lines move the beginning of the coordinate system into the middle of the window. By default, it is positioned at 0, 0 point. In another words, at the upper left corner of the window. By moving the coordinate system, the drawing will be much easier.
for (qreal rot=0; rot < 360.0; rot+=5.0 ) {
    painter.drawEllipse(-125, -40, 250, 80);
    painter.rotate(5.0);
}
In this for cycle, we draw 72 rotated ellipses.
main.cpp
#include "donut.h"
#include <QApplication>


int main(int argc, char *argv[])
{
  QApplication app(argc, argv);  

  Donut window;

  window.resize(350, 280);
  window.move(300, 300);  
  window.setWindowTitle("Donut");
  window.show();

  return app.exec();
}
Main file.

Shapes

The Qt4 painting API can draw various shapes. The following programming code example will show some of them.
shapes.h
#include <QWidget>

class Shapes : public QWidget
{
  Q_OBJECT  

  public:
    Shapes(QWidget *parent = 0);

  protected:
    void paintEvent(QPaintEvent *event);

};
Header file.
shapes.cpp
#include "shapes.h"
#include <QPainter>
#include <QPainterPath>


Shapes::Shapes(QWidget *parent)
    : QWidget(parent)
{

}

void Shapes::paintEvent(QPaintEvent *e)
{
  Q_UNUSED(e);
  QPainter painter(this);

  painter.setRenderHint(QPainter::Antialiasing);
  painter.setPen(QPen(QBrush("#888"), 1));
  painter.setBrush(QBrush(QColor("#888")));

  QPainterPath path1;

  path1.moveTo(5, 5);
  path1.cubicTo(40, 5,  50, 50,  99, 99);
  path1.cubicTo(5, 99,  50, 50,  5, 5);
  painter.drawPath(path1);  

  painter.drawPie(130, 20, 90, 60, 30*16, 120*16);
  painter.drawChord(240, 30, 90, 60, 0, 16*180);
  painter.drawRoundRect(20, 120, 80, 50);

  QPolygon polygon;
  polygon << QPoint(130, 140) << QPoint(180, 170)
          << QPoint(180, 140) << QPoint(220, 110)
          << QPoint(140, 100);
  painter.drawPolygon(polygon);

  painter.drawRect(250, 110, 60, 60);

  QPointF baseline(20, 250);
  QFont font("Georgia", 55);
  QPainterPath path2;
  path2.addText(baseline, font, "Q");
  painter.drawPath(path2);

  painter.drawEllipse(140, 200, 60, 60);
  painter.drawEllipse(240, 200, 90, 60);
}

We draw nine different shapes.
QPainterPath path1;

path1.moveTo(5, 5);
path1.cubicTo(40, 5,  50, 50,  99, 99);
path1.cubicTo(5, 99,  50, 50,  5, 5);
painter.drawPath(path1);
The QPainterPath is an object used to create complex shapes. We use it to draw bezier curves.
painter.drawPie(130, 20, 90, 60, 30*16, 120*16);
painter.drawChord(240, 30, 90, 60, 0, 16*180);
painter.drawRoundRect(20, 120, 80, 50);
These code lines draw a pie, a chord and a rounded rectangle.
QPolygon polygon;
polygon << QPoint(130, 140) << QPoint(180, 170)
        << QPoint(180, 140) << QPoint(220, 110)
        << QPoint(140, 100);
painter.drawPolygon(polygon);
Here we draw a polygon consisting of five points.
QPointF baseline(20, 250);
QFont font("Georgia", 55);
QPainterPath path2;
path2.addText(baseline, font, "Q");
painter.drawPath(path2);
The Qt4 programming library can be used to create a path based on a font character.
painter.drawEllipse(140, 200, 60, 60);
painter.drawEllipse(240, 200, 90, 60);
The drawEllipse() method can be used to draw an ellipse and a circle as well. The circle is a special case of an ellipse.
main.cpp
#include "shapes.h"
#include <QApplication>

int main(int argc, char *argv[])
{
  QApplication app(argc, argv);  

  Shapes window;

  window.resize(350, 280);
  window.move(300, 300);    
  window.setWindowTitle("Shapes");
  window.show();
  
  return app.exec();
}
Main file.
Shapes
Figure: Shapes

Gradients

In computer graphics, gradient is a smooth blending of shades from light to dark or from one colour to another. In 2D drawing programs and paint programs, gradients are used to create colourful backgrounds and special effects as well as to simulate lights and shadows. (answers.com)
The following code example will show, how to create gradients in Qt4 programming library.
gradients.h
#ifndef GRADIENT_H
#define GRADIENT_H

#include <QWidget>

class Gradient : public QWidget
{

  public:
    Gradient(QWidget *parent = 0);

  protected:
    void paintEvent(QPaintEvent *event);

};

#endif
Header file.
gradients.cpp
#include "gradients.h"
#include <QApplication>
#include <QPainter>

Gradient::Gradient(QWidget *parent)
    : QWidget(parent)
{

}

void Gradient::paintEvent(QPaintEvent *e)
{
  Q_UNUSED(e);
  
  QPainter painter(this);

  QLinearGradient grad1(0, 20, 0, 110);

  grad1.setColorAt(0.1, Qt::black);
  grad1.setColorAt(0.5, Qt::yellow);
  grad1.setColorAt(0.9, Qt::black);

  painter.fillRect(20, 20, 300, 90, grad1);

  QLinearGradient grad2(0, 55, 250, 0);

  grad2.setColorAt(0.2, Qt::black);
  grad2.setColorAt(0.5, Qt::red);
  grad2.setColorAt(0.8, Qt::black);

  painter.fillRect(20, 140, 300, 100, grad2);
}
In the code example, we will draw two rectagles and fill them with gradients.
QLinearGradient grad1(0, 20, 0, 110);

grad1.setColorAt(0.1, Qt::black);
grad1.setColorAt(0.5, Qt::yellow);
grad1.setColorAt(0.9, Qt::black);
The colorus in a gradient are defined using stop points. The setColorAt() creates a stop point at the given position with the given colour.
painter.fillRect(20, 20, 300, 90, grad1);
We fill the rectangle with the gradient.
main.cpp
#include "gradients.h"
#include <QApplication>

int main(int argc, char *argv[])
{
  QApplication app(argc, argv);  

  Gradient window;

  window.resize(350, 260);
  window.move(300, 300);    
  window.setWindowTitle("Gradients");
  window.show();
  
  return app.exec();
}
Main file.
Gradients
Figure: Gradients

Puff

In the last example of this C++ Qt4 tutorial chapter, we create a puff effect. The example will display a growing centered text, that will gradully fade out from some point. This is a very common effect, which you can often see in flash animations on the web.
puff.h
#pragma once

#include <QWidget>

class Puff : public QWidget
{
  Q_OBJECT  

  public:
    Puff(QWidget *parent = 0);

  protected:
    void paintEvent(QPaintEvent *event);
    void timerEvent(QTimerEvent *event);

  private:
    int x;
    qreal opacity;
    int timerId;
};
In the header file, we have two event handlers defined. Paint event handler and timer handler.
puff.cpp
#include "puff.h"
#include <QPainter>
#include <QTimer>
#include <QTextStream>


Puff::Puff(QWidget *parent)
    : QWidget(parent)
{
  x = 1;
  opacity = 1.0;
  timerId = startTimer(15);
}

void Puff::paintEvent(QPaintEvent *e)
{
  Q_UNUSED(e);  
  
  QPainter painter(this);
  QTextStream out(stdout);

  QString text = "ZetCode";

  painter.setPen(QPen(QBrush("#575555"), 1));

  QFont font("Courier", x, QFont::DemiBold);
  QFontMetrics fm(font);
  int textWidth = fm.width(text);

  painter.setFont(font);

  if (x > 10) {
    opacity -= 0.01;
    painter.setOpacity(opacity);
  }

  if (opacity <= 0) {
    killTimer(timerId);
    out << "timer stopped\n";
  }

  int h = height();
  int w = width();

  painter.translate(QPoint(w/2, h/2));
  painter.drawText(-textWidth/2, 0, text);
}

void Puff::timerEvent(QTimerEvent *e)
{
  Q_UNUSED(e);
  
  x += 1;
  repaint();
}
This is the puff.cpp file.
Puff::Puff(QWidget *parent)
    : QWidget(parent)
{
  x = 1;
  opacity = 1.0;
  timerId = startTimer(15);
}
At the constructor, we start the timer. Each 15ms a timer event is generated.
void Puff::timerEvent(QTimerEvent *event)
{
  x += 1;
  repaint();
}
Inside the timerEvent() we increase the font size and repaint the widget.
 if (x > 10) {
   opacity -= 0.01;
   painter.setOpacity(opacity);
 }
If the font size is greater than 10 points, we gradually decrease the opacity. The text fades away.
if (opacity <= 0) {
  killTimer(timerId);
  out << "timer stopped\n";
}
If the text fades away, we kill the timer.
main.cpp
#include "puff.h"
#include <QApplication>

int main(int argc, char *argv[])
{
  QApplication app(argc, argv); 

  Puff window;

  window.resize(350, 280);
  window.move(300, 300);      
  window.setWindowTitle("Puff");
  window.show();

  return app.exec();
}
Main file.
This chapter was about painting in Qt4.

Advance Qt4 widgets

In this part of the Qt4 C++ programming tutorial, we will continue talking about the Qt4 widgets.

QCheckBox

The QCheckBox is a widget that has two states. On and Off. It is a box with a label. If the checkbox is checked, it is represented by a tick in a box.
In our example, we display a checkbox on the window. If the checkbox is checked, the title of the window is displayed. Otherwise it is hidden.
checkbox.h
#ifndef CHECKBOX_H
#define CHECKBOX_H

#include <QWidget>

class CheckBox : public QWidget
{
  Q_OBJECT

  public:
    CheckBox(QWidget *parent = 0);

  private slots:
    void showTitle(int);

};

#endif
This is a header file for our code example.
checkbox.cpp
#include "checkbox.h"
#include <QCheckBox>


CheckBox::CheckBox(QWidget *parent)
    : QWidget(parent)
{
  QCheckBox *cb = new QCheckBox("Show Title", this);
  cb->setCheckState(Qt::Checked);
  cb->move(50, 50);

  connect(cb, SIGNAL(stateChanged(int)), this, SLOT(showTitle(int)));
}

void CheckBox::showTitle(int state)
{
  if (state == Qt::Checked) {
    setWindowTitle("QCheckBox");
  } else {
    setWindowTitle("");
  }
}
We display a checkbox on the window and connect it to the showTitle() slot.
cb->setCheckState(Qt::Checked);
The checkbox is checked, when the example starts.
void CheckBox::showTitle(int state)
{
  if (state == Qt::Checked) {
    setWindowTitle("QCheckBox");
  } else {
    setWindowTitle("");
  }
}
We determine the state of the check box and call the setWindowTitle() accordingly.
main.cpp
#include "checkbox.h"
#include <QApplication>

int main(int argc, char *argv[])
{
  QApplication app(argc, argv);  
    
  CheckBox window;

  window.resize(250, 150);
  window.move(300, 300);
  window.setWindowTitle("QCheckBox");
  window.show();

  return app.exec();
}
The main file.
QCheckBox
Figure: QCheckBox

QListWidget

A QListWidget is a widget that is used to display a list of items. In our example, we will demonstrate how to add, rename and remove items from the list widget.
listwidget.h
#ifndef LISTWIDGET_H
#define LISTWIDGET_H

#include <QWidget>
#include <QPushButton>
#include <QListWidget>

class ListWidget : public QWidget
{
  Q_OBJECT

  public:
    ListWidget(QWidget *parent = 0);

  private slots:
    void addItem();
    void renameItem();
    void removeItem();
    void clearItems();

  private:
    QListWidget *lw;
    QPushButton *add;
    QPushButton *rename;
    QPushButton *remove;
    QPushButton *removeAll;
 
};

#endif
The header file for the example.
listwidget.cpp
#include "listwidget.h"
#include <QVBoxLayout>
#include <QInputDialog>


ListWidget::ListWidget(QWidget *parent)
    : QWidget(parent)
{
  QVBoxLayout *vbox = new QVBoxLayout();
  vbox->setSpacing(10);

  QHBoxLayout *hbox = new QHBoxLayout(this);

  lw = new QListWidget(this);
  lw->addItem("The Omen"); 
  lw->addItem("The Exorcist");
  lw->addItem("Notes on a scandal");
  lw->addItem("Fargo");
  lw->addItem("Capote");

  add = new QPushButton("Add", this);
  rename = new QPushButton("Rename", this);
  remove = new QPushButton("Remove", this);
  removeAll = new QPushButton("Remove All", this);

  vbox->setSpacing(3);
  vbox->addStretch(1);
  vbox->addWidget(add);
  vbox->addWidget(rename);
  vbox->addWidget(remove);
  vbox->addWidget(removeAll);
  vbox->addStretch(1);

  hbox->addWidget(lw);
  hbox->addSpacing(15);
  hbox->addLayout(vbox);

  connect(add, SIGNAL(clicked()), this, SLOT(addItem()));
  connect(rename, SIGNAL(clicked()), this, SLOT(renameItem()));
  connect(remove, SIGNAL(clicked()), this, SLOT(removeItem()));
  connect(removeAll, SIGNAL(clicked()), this, SLOT(clearItems()));

  setLayout(hbox);
}

void ListWidget::addItem()
{
  QString item = QInputDialog::getText(this, "Item",
         "Enter new item");
  item = item.simplified();
  if (!item.isEmpty()) {
    lw->addItem(item);
    int r = lw->count() - 1;
    lw->setCurrentRow(r);
  }
}

void ListWidget::renameItem()
{
  QListWidgetItem *curitem = lw->currentItem();
  int r = lw->row(curitem);
  QString text = curitem->text();
  QString item = QInputDialog::getText(this, "Item", 
             "Enter new item", QLineEdit::Normal, text);

  item = item.simplified();

  if (!item.isEmpty()) {
    lw->takeItem(r);
    delete curitem;
    lw->insertItem(r, item);
    lw->setCurrentRow(r);
  }
}

void ListWidget::removeItem()
{
  QListWidgetItem *item = lw->currentItem();

  if (item) {
    int r = lw->row(item);
    lw->takeItem(r);
    delete item;
  }
}

void ListWidget::clearItems()
{
  if (lw->count() != 0)
    lw->clear();
}
We display a list widget and four buttons. We will use these buttons to add, rename and remove items from the list widget.
lw = new QListWidget(this);
lw->addItem("The Omen"); 
lw->addItem("The Exorcist");
lw->addItem("Notes on a scandal");
lw->addItem("Fargo");
lw->addItem("Capote);
The QListWidget is created and filled with five items.
void ListWidget::addItem()
{
  QString item = QInputDialog::getText(this, "Item",
         "Enter new item");
  item = item.simplified();
  if (!item.isEmpty()) {
    lw->addItem(item);
    int r = lw->count() - 1;
    lw->setCurrentRow(r);
  }
}
The addItem() method adds a new item to the list widget. The method pops up a dialog. The dialog returns a string value. We remove possible white spaces from the string using the simplified() method. If the returned string is not empty, we add it to the list widget. Finally, we highlight the currently inserted item.
void ListWidget::renameItem()
{
  QListWidgetItem *curitem = lw->currentItem();
  int r = lw->row(curitem);
  QString text = curitem->text();
  QString item = QInputDialog::getText(this, "Item", 
             "Enter new item", QLineEdit::Normal, text);

  item = item.simplified();

  if (!item.isEmpty()) {
    lw->takeItem(r);
    delete curitem;
    lw->insertItem(r, item);
    lw->setCurrentRow(r);
  }
}
Renaming an item consists of several steps. First we get the current item using the currentItem() method. We get the text of the item and the row, where the item is located. The text of the item is displayed in the QInputDialog dialog. The string that is returned from the dialog is processed by the simplified() method to remove potential white spaces. Then we remove the old item with the takeItem() method and replace it with the insertItem() method. Finally, the setCurrentRow() selects the new item.
void ListWidget::removeItem()
{
 QListWidgetItem *item = lw->currentItem();

 if (item) {
   int r = lw->row(item);
   lw->takeItem(r);
   delete item;
 }
}
The removeItem() removes a specific item from the list. First, we get the currently selected QListWidgetItem. We determine the current row and remove the item using the takeItem() method. Notice that we manually delete the QListWidgetItem.
void ListWidget::clearItems()
{
  if (lw->count() != 0)
    lw->clear();
}
The clear() method removes all items from the list widget.
main.cpp
#include "listwidget.h"
#include <QApplication>

int main(int argc, char *argv[])
{
  QApplication app(argc, argv);  
    
  ListWidget window;

  window.move(300, 300);
  window.setWindowTitle("QListWidget");
  window.show();
  
  return app.exec();
}
Main file.
QListWidget
Figure: QListWidget

QPixmap

QPixmap is one of the widgets used to work with images. It is optimized for showing images on screen. In our code example, we will use QPixmap to display an image on the window.
pixmap.h
#ifndef PIXMAP_H
#define PIXMAP_H

#include <QWidget>

class Pixmap : public QWidget
{
  public:
    Pixmap(QWidget *parent = 0);
 
};

#endif
The header file for the example.
pixmap.cpp
#include "pixmap.h"
#include <QPixmap>
#include <QLabel>
#include <QHBoxLayout>

Pixmap::Pixmap(QWidget *parent)
    : QWidget(parent)
{
  QHBoxLayout *hbox = new QHBoxLayout(this);

  QPixmap pixmap("bojnice.jpg");

  QLabel *label = new QLabel(this);
  label->setPixmap(pixmap);

  hbox->addWidget(label);
  setLayout(hbox);
}
We show an image of a famous castle located in middle Slovakia.
QPixmap pixmap("bojnice.jpg");

QLabel *label = new QLabel(this);
label->setPixmap(pixmap);
We create a pixmap and put it inside a label widget.
main.cpp
#include "pixmap.h"
#include <QApplication>

int main(int argc, char *argv[])
{
  QApplication app(argc, argv);  
    
  Pixmap window;

  window.move(300, 300);
  window.setWindowTitle("QPixmap");
  window.show();
  
  return app.exec();
}
Main file.

QSplitter

QSplitter lets the user control the size of child widgets by dragging the boundary between the children. In our example, we show three QFrame widgets organized with two splitters.
splitter.h
#pragma once

#include <QWidget>

class Splitter : public QWidget
{
  public:
    Splitter(QWidget *parent = 0);
 
};
The header file for the example.
splitter.cpp
#include "splitter.h"
#include <QFrame>
#include <QSplitter>
#include <QHBoxLayout>


Splitter::Splitter(QWidget *parent)
    : QWidget(parent)
{
  QHBoxLayout *hbox = new QHBoxLayout(this);

  QFrame *topleft = new QFrame(this);
  topleft->setFrameShape(QFrame::StyledPanel);

  QFrame *topright = new QFrame(this);
  topright->setFrameShape(QFrame::StyledPanel);

  QSplitter *splitter1 = new QSplitter(Qt::Horizontal, this);
  splitter1->addWidget(topleft);
  splitter1->addWidget(topright);

  QFrame *bottom = new QFrame(this);
  bottom->setFrameShape(QFrame::StyledPanel);

  QSplitter *splitter2 = new QSplitter(Qt::Vertical, this);
  splitter2->addWidget(splitter1);
  splitter2->addWidget(bottom);

  hbox->addWidget(splitter2);
  setLayout(hbox);
}
We have three frame widgets and two splitter widgets.
QSplitter *splitter1 = new QSplitter(Qt::Horizontal, this);
splitter1->addWidget(topleft);
splitter1->addWidget(topright);
We create a splitter widget and add two frame widgets into the splitter.
QSplitter *splitter2 = new QSplitter(Qt::Vertical, this);
splitter2->addWidget(splitter1);
We can also add splitter to another splitter widget.
main.cpp
#include "splitter.h"
#include <QApplication>


int main(int argc, char *argv[])
{
  QApplication app(argc, argv);  
    
  Splitter window;

  window.resize(350, 300);
  window.move(300, 300);
  window.setWindowTitle("QSplitter");
  window.show();
  
  return app.exec();
}
Main file.
QSplitter
Figure: QSplitter
In some desktop themes the splitter might not be visible very well.

QTableWidget

QTableWidget is a unique widget used in spreadsheet applications. It is also called a grid widget sometimes. It is one of the more complicated widgets. Here we only display the widget on the window.
table.h
#ifndef TABLE_H
#define TABLE_H

#include <QWidget>

class Table : public QWidget
{
  public:
    Table(QWidget *parent = 0);
 
};

#endif
The header file for the example.
table.cpp
#include "table.h"
#include <QHBoxLayout>
#include <QTableWidget>

Table::Table(QWidget *parent)
    : QWidget(parent)
{
  QHBoxLayout *hbox = new QHBoxLayout(this);

  QTableWidget *table = new QTableWidget(25, 25, this);

  hbox->addWidget(table);
  setLayout(hbox);
}
 QTableWidget *table = new QTableWidget(25, 25, this);
Here we create the table widget with 25 rows and 25 columns.
main.cpp
#include "table.h"
#include <QApplication>

int main(int argc, char *argv[])
{
  QApplication app(argc, argv);  
    
  Table window;

  window.move(300, 300);
  window.setWindowTitle("QTableWidget");
  window.show();

  return app.exec();
}
Main file.
QTableWidget
Figure: QTableWidget
In this chapter, we have described several other Qt4 widgets.

Some basic Qt4 widgets

In this part of the Qt4 C++ programming tutorial, we will talk about some basic Qt4 widgets.
Widgets are basic building blocks of a GUI application. Qt4 library has a rich set of various widgets.

QLabel

The QLabel widget is used to display text and image. No user interaction is available. The following example will display text.
label.h
#ifndef LABEL_H
#define LABEL_H

#include <QWidget>
#include <QLabel>

class Label : public QWidget
{
  public:
    Label(QWidget *parent = 0);

  private:
    QLabel *label;

};

#endif
This is a header file for our code example.
label.cpp
#include <QVBoxLayout>
#include <QFont>
#include "label.h"

Label::Label(QWidget *parent)
    : QWidget(parent)
{
  QString lyrics = "Who doesn't long for someone to hold\n\
Who knows how to love you without being told\n\
Somebody tell me why I'm on my own\n\
If there's a soulmate for everyone\n\
\n\
Here we are again, circles never end\n\
How do I find the perfect fit\n\
There's enough for everyone\n\
But I'm still waiting in line\n\
\n\
Who doesn't long for someone to hold\n\
Who knows how to love you without being told\n\
Somebody tell me why I'm on my own\n\
If there's a soulmate for everyone";

  label = new QLabel(lyrics, this);
  label->setFont(QFont("Purisa", 10));

  QVBoxLayout *vbox = new QVBoxLayout();
  vbox->addWidget(label);
  setLayout(vbox);
}
We use QLabel widget to display lyrics in a window.
label = new QLabel(lyrics, this);
label->setFont(QFont("Purisa", 10));
We create a label widget and set a specific font for it.
main.cpp
#include <QApplication>
#include <QTextStream>
#include "label.h"

int main(int argc, char *argv[])
{
  QApplication app(argc, argv);  
    
  Label window;

  window.move(300, 300);
  window.setWindowTitle("QLabel");
  window.show();

  return app.exec();
}
The main file.
QLabel
Figure: QLabel

QSlider

QSlider is a widget that has a simple handle. This handle can be pulled back and forth. This way we are choosing a value for a specific task.
slider.h
#ifndef SLIDER_H
#define SLIDER_H

#include <QWidget>
#include <QSlider>
#include <QLabel>

class Slider : public QWidget
{
  Q_OBJECT
  
  public:
    Slider(QWidget *parent = 0);

  private:
    QSlider *slider; 
    QLabel *label;

};

#endif
The header file for the example.
slider.cpp
#include "slider.h"

Slider::Slider(QWidget *parent)
    : QWidget(parent)
{ 
  slider = new QSlider(Qt::Horizontal , this);
  slider->setGeometry(50, 50, 130, 30);

  label = new QLabel("0", this);
  label->setGeometry(230, 50, 20, 30);

  connect(slider, SIGNAL(valueChanged(int)), label, SLOT(setNum(int)));
}
We display two widgets. A slider and a label. The slider will control the number displayed in the label.
slider = new QSlider(Qt::Horizontal , this);
A horizontal QSlider is created.
connect(slider, SIGNAL(valueChanged(int)), label, SLOT(setNum(int)));
In this code line, we connect the valueChanged() signal to the predefined setNum() slot.
main.cpp
#include <QApplication>
#include "slider.h"

int main(int argc, char *argv[])
{
  QApplication app(argc, argv);  
    
  Slider window;

  window.move(300, 300);
  window.setWindowTitle("QSlider");
  window.show();

  return app.exec();
}
Main file.
QSlider
Figure: QSlider

QSpinBox

QSpinbox is a widget that is used to handle integers and discrete sets of values. In our code example, we will have one spinbox widget. We can choose numbers 0..99. The currently chosen value is displayed on the titlebar of the window.
spinbox.h
#ifndef SPINBOX_H
#define SPINBOX_H

#include <QWidget>
#include <QSpinBox>

class SpinBox : public QWidget
{
  Q_OBJECT

  public:
    SpinBox(QWidget *parent = 0);

  private slots:
    void setTitle(int);

  private:
    QSpinBox *spinbox;

};

#endif
The header file for the spinbox example.
spinbox.cpp
#include "spinbox.h"

SpinBox::SpinBox(QWidget *parent)
    : QWidget(parent)
{
  spinbox = new QSpinBox(this);
  spinbox->setGeometry(50, 50, 60, 30);

  connect(spinbox, SIGNAL(valueChanged(int)), 
      this, SLOT(setTitle(int)));

}

void SpinBox::setTitle(int val) 
{
  setWindowTitle(QString::number(val));

}
We place a spinbox on the window. And connect the valueChanged() signal to the setTitle() method.
void SpinBox::setTitle(int val) 
{
  setWindowTitle(QString::number(val));
}
The method will set a window title to the current number, chosen with the spinbox.
main.cpp
#include <QApplication>
#include "spinbox.h"

int main(int argc, char *argv[])
{
  QApplication app(argc, argv);  
    
  SpinBox window;

  window.resize(250, 150);
  window.move(300, 300);  
  window.setWindowTitle("0");
  window.show();

  return app.exec();
}
Main file.
QSpinBox
Figure: QSpinBox

QLineEdit

QLineEdit is a widget that allows to enter and edit a single line of plain text. There are undo/redo, cut/paste and drag & drop functions available for QLineEdit widget.
In our example, we show three labels and three line edits.
ledit.h
#ifndef LEDIT_H
#define LEDIT_H

#include <QWidget>

class Ledit : public QWidget
{
  public:
    Ledit(QWidget *parent = 0);

};

#endif
The header file for the example.
ledit.cpp
#include <QGridLayout>
#include <QLabel>
#include <QLineEdit>
#include "ledit.h"

Ledit::Ledit(QWidget *parent)
    : QWidget(parent)
{
  QLabel *name = new QLabel("Name:", this);
  QLabel *age = new QLabel("Age:", this);
  QLabel *occupation = new QLabel("Occupation:", this);

  QLineEdit *le1 = new QLineEdit(this);
  QLineEdit *le2 = new QLineEdit(this);
  QLineEdit *le3 = new QLineEdit(this);

  QGridLayout *grid = new QGridLayout(); 

  grid->addWidget(name, 0, 0);
  grid->addWidget(le1, 0, 1);
  grid->addWidget(age, 1, 0);
  grid->addWidget(le2, 1, 1);
  grid->addWidget(occupation, 2, 0);
  grid->addWidget(le3, 2, 1);

  setLayout(grid);
}
We display three labels and three line edits. These widgets are organized with the QGridLayout manager.
main.cpp
#include "ledit.h"
#include <QApplication>


int main(int argc, char *argv[])
{
  QApplication app(argc, argv);  
    
  Ledit window;

  window.move(300, 300);
  window.setWindowTitle("QLineEdit");
  window.show();

  return app.exec();
}
Main file.
QLineEdit
Figure: QLineEdit

Statusbar

A statusbar is a panel, that is used to display status information about the application.
In our example, we have two buttons and a statusbar. Each of the buttons shows a message, if we click on them. The statusbar widget is part of the QMainWindow widget.
statusbar.h
#ifndef STATUSBAR_H
#define STATUSBAR_H

#include <QMainWindow>
#include <QPushButton>

class Statusbar : public QMainWindow
{
  Q_OBJECT  

  public:
    Statusbar(QWidget *parent = 0);

  private slots:
    void OnOkPressed();
    void OnApplyPressed();

  private:
    QPushButton *ok;
    QPushButton *apply;

};

#endif
The header file for the example.
statusbar.cpp
#include <QGridLayout>
#include <QLabel>
#include <QFrame>
#include <QStatusBar>
#include "statusbar.h"

Statusbar::Statusbar(QWidget *parent)
    : QMainWindow(parent)
{
  QFrame *frame = new QFrame(this);
  setCentralWidget(frame);

  ok = new QPushButton("OK", frame);
  ok->move(20, 50);

  apply = new QPushButton("Apply", frame);
  apply->move(120, 50);

  statusBar();

  connect(ok, SIGNAL(clicked()), this, SLOT(OnOkPressed()));
  connect(apply, SIGNAL(clicked()), this, SLOT(OnApplyPressed()));
}

void Statusbar::OnOkPressed()
{
  statusBar()->showMessage("OK button pressed", 2000);
}

void Statusbar::OnApplyPressed()
{
 statusBar()->showMessage("Apply button pressed", 2000);
}
This is statusbar.cpp file.
QFrame *frame = new QFrame(this);
setCentralWidget(frame);
The QFrame widget is put into the center area of the QMainWindow widget.
ok = new QPushButton("OK", frame);
ok->move(20, 50);

apply = new QPushButton("Apply", frame);
apply->move(120, 50);
We create and position two button widgets.
statusBar();
To display a statusbar widget, we call the statusBar() method of the QMainWindow widget.
void Statusbar::OnOkPressed()
{
  statusBar()->showMessage("OK button pressed", 2000);
}
The showMessage() method shows the message on the statusbar.
main.cpp
#include <QApplication>
#include "statusbar.h"

int main(int argc, char *argv[])
{
  QApplication app(argc, argv);  
    
  Statusbar window;

  window.resize(250, 150);
  window.move(300, 300);
  window.setWindowTitle("QStatusBar");
  window.show();
  
  return app.exec();
}
Main file.
Statusbar example
Figure: Statusbar example
In this part of the Qt4 tutorial, we have introduced several Qt4 widgets.

Events and signals in Qt4

In this part of the Qt4 C++ programming tutorial we talk about events and signals.
Events are an important part in any GUI program. All GUI applications are event-driven. An application reacts to different event types which are generated during it's life. Events are generated mainly by the user of an application. But they can be generated by other means as well. e.g. internet connection, window manager, timer. In the event model, there are three participants:
  • event source
  • event object
  • event target
The event source is the object whose state changes. It generates Events. The event object (Event) encapsulates the state changes in the event source. The event target is the object that wants to be notified. Event source object delegates the task of handling an event to the event target.
When we call the application's exec() method, the application enters the main loop. The main loop fetches events and sends them to the objects. Trolltech has introduced a unique signal and slot mechanism. This signal and slot mechanism is an extension to the C++ programming language.
Signals and slots are used for communication between objects. A signal is emitted when a particular event occurs. A slot is a normal C++ method. A slot is called when a signal connected to it is emitted.

Click

The first example shows a very simple event handling example. We have one push button. By clicking on the push button, we terminate the application.
click.h
#pragma once

#include <QWidget>

class Click : public QWidget
{
  public:
    Click(QWidget *parent = 0);

};
Header file.
click.cpp
#include <QPushButton>
#include <QApplication>
#include "click.h"

Click::Click(QWidget *parent)
    : QWidget(parent)
{
  QPushButton *quit = new QPushButton("Quit", this);
  quit->setGeometry(50, 40, 75, 30);

  connect(quit, SIGNAL(clicked()), qApp, SLOT(quit()));
}
We display a QPushButton on the window.
connect(quit, SIGNAL(clicked()), qApp, SLOT(quit()));
The connect() method connects a signal to the slot. When we click on the quit button, the clicked() signal is generated. The qApp is a global pointer to the application object. It is defined in the <QApplication> header file. The quit() method is called, when the clicked signal is emitted.
main.cpp
#include <QApplication>
#include "click.h"

int main(int argc, char *argv[])
{
  QApplication app(argc, argv);  
    
  Click window;
  
  window.move(300, 300);
  window.resize(250, 150);
  window.setWindowTitle("Click");
  window.show();

  return app.exec();
}
Main file.
Click
Figure: Click

KeyPress

In the following example, we will react to a key press.
keypress.h
#pragma once

#include <QWidget>

class KeyPress : public QWidget
{
  public:
    KeyPress(QWidget *parent = 0);

  protected:
    void keyPressEvent(QKeyEvent * e);
};
Header file.
keypress.cpp
#include <QApplication>
#include <QKeyEvent>

#include "keypress.h"

KeyPress::KeyPress(QWidget *parent)
    : QWidget(parent)
{

}

void KeyPress::keyPressEvent(QKeyEvent *event)
{
   if (event->key() == Qt::Key_Escape) {  
       qApp->quit();
   } 
}
The application terminates, if we press the Escape key.
void KeyPress::keyPressEvent(QKeyEvent *e)
{
   if (e->key() == Qt::Key_Escape) {  
       qApp->quit();
   } 
}
One of the ways of working with events in Qt4 programming library is to reimplement an event handler. The QKeyEvent is an event object, which holds information about what has happened. In our case, we use the event object to determine, which key was actually pressed.
main.cpp
#include <QApplication>
#include "keypress.h"

int main(int argc, char *argv[])
{
  QApplication app(argc, argv);  
    
  KeyPress window;
  
  window.resize(250, 150);
  window.move(300, 300);
  window.setWindowTitle("Key press");
  window.show();

  return app.exec();
}
Main file.

QMoveEvent

The QMoveEvent class contains event parameters for move events. Move events are sent to widgets that have been moved.
move.h
#pragma once

#include <QMainWindow>

class Move : public QWidget
{
  Q_OBJECT

  public:
    Move(QWidget *parent = 0);
 
  protected:
    void moveEvent(QMoveEvent *e);

};
Header file.
move.cpp
#include <QMoveEvent>
#include "move.h"

Move::Move(QWidget *parent)
    : QWidget(parent)
{
  
}

void Move::moveEvent(QMoveEvent *e)
{
  int x = e->pos().x();
  int y = e->pos().y();
  
  QString text = QString::number(x) + "," + QString::number(y);

  setWindowTitle(text);
}
In our code programming example, we react to a move event. We determine the current x, y coordinates of the upper left corner of the client area of the window and set those values to the title of the window.
int x = e->pos().x();
int y = e->pos().y();
We use the QMoveEvent object to determine the x, y values.
QString text = QString::number(x) + "," + QString::number(y);
We convert the integer values to strings.
setWindowTitle(text);
Set the text to the title of the window.
main.cpp
#include <QApplication>
#include "move.h"

int main(int argc, char *argv[])
{
  QApplication app(argc, argv);  
    
  Move window;
  
  window.resize(250, 150);
  window.move(300, 300);
  window.setWindowTitle("Move");
  window.show();
  
  return app.exec();
}
Main file.
QMoveEvent
Figure: QMoveEvent

Disconnecting an signal

A signal can be disconnected from the slot. The next example will show, how we can accomplish this.
disconnect.h
#pragma once

#include <QWidget>
#include <QPushButton>

class Disconnect : public QWidget
{
  Q_OBJECT  

  public:
    Disconnect(QWidget *parent = 0);

  private slots:
    void onClick();
    void onCheck(int);

  private:
    QPushButton *click;
};
In the header file, we have declared two slots. The slots is not a C++ keyword. It is a Qt4 programming library extension. These extensions are handled by the preprocessor, before the code is compiled. When we use signals and slots in our classes, we must provide a Q_OBJECT macro at the beginnig of the class definition. Otherwise, the preprocessor would complain.
disconnect.cpp
#include <QTextStream>
#include <QCheckBox>
#include "disconnect.h"

Disconnect::Disconnect(QWidget *parent)
    : QWidget(parent)
{
  click = new QPushButton("Click", this);
  click->setGeometry(50, 40, 75, 30);

  QCheckBox *cb = new QCheckBox("Connect", this);
  cb->setCheckState(Qt::Checked);
  cb->move(150, 40);

  connect(click, SIGNAL(clicked()), this, SLOT(onClick()));
  connect(cb, SIGNAL(stateChanged(int)), this, SLOT(onCheck(int)));  
}

void Disconnect::onClick() 
{
  QTextStream out(stdout);
  out << "Button clicked" <<  endl;
}

void Disconnect::onCheck(int state)
{
  if (state == Qt::Checked) {
    connect(click, SIGNAL(clicked()), this, SLOT(onClick()));
  } else {
    click->disconnect(SIGNAL(clicked()));
  }
}
In our example, we have a button and a check box. The check box connects and disconnects a slot from the buttons clicked signal. This example must be executed from the command line.
connect(click, SIGNAL(clicked()), 
    this, SLOT(onClick()));
connect(cb, SIGNAL(stateChanged(int)), 
    this, SLOT(onCheck(int)));
Here we connect signals to our user defined slots.
void Disconnect::onClick() 
{
  QTextStream out(stdout);
  out << "Button clicked" << endl;
}
If we click on the click button, we send "Button clicked" text to the terminal window.
void Disconnect::onCheck(int state)
{
  if (state == Qt::Checked) {
    connect(click, SIGNAL(clicked()), 
        this, SLOT(onClick()));
  } else {
    click->disconnect(SIGNAL(clicked()));
  }
}
Inside the onCheck() slot, we connect/disconnect an onClick() slot from the click button.
main.cpp
#include <QApplication>
#include "disconnect.h"

int main(int argc, char *argv[])
{
  QApplication app(argc, argv);  
    
  Disconnect window;
  
  window.resize(250, 150);
  window.move(300, 300);
  window.setWindowTitle("Disconnect");
  window.show();
  
  return app.exec();
}
Main file.

Timer

A timer is used to implement single shot or repetitive tasks. A good example where we use a timer is a clock. Each second we must update our label displaying the current time.
timer.h
#pragma once

#include <QWidget>
#include <QLabel>

class Timer : public QWidget
{
  public:
    Timer(QWidget *parent = 0);

  protected:
    void timerEvent(QTimerEvent *e);

  private:
    QLabel *label;
};
Header file.
timer.cpp
#include <QTime>
#include "timer.h"

Timer::Timer(QWidget *parent)
    : QWidget(parent)
{   
  label = new QLabel("", this);
  label->move(50, 50);

  QTime qtime = QTime::currentTime();
  QString stime = qtime.toString();
  label->setText(stime);
   
  startTimer(1000);
}

void Timer::timerEvent(QTimerEvent *e)
{
  Q_UNUSED(e);
  
  QTime qtime = QTime::currentTime();
  QString stime = qtime.toString();
  label->setText(stime);
}
In our example, we display a current local time on the window.
label = new QLabel("", this);
label->move(50, 50);
To display a time, we use a label widget.
QTime qtime = QTime::currentTime();
QString stime = qtime.toString();
label->setText(stime);
Here we determine the current local time. We set it to the label widget.
startTimer(1000);
We start the timer. Every 1000ms a timer event is generated.
void Timer::timerEvent(QTimerEvent *e)
{
  Q_UNUSED(e);
  
  QTime qtime = QTime::currentTime();
  QString stime = qtime.toString();
  label->setText(stime);
}
To work with timer events, we must reimplement the timerEvent() method.
main.cpp
#include <QApplication>
#include "timer.h"

int main(int argc, char *argv[])
{
  QApplication app(argc, argv);  
    
  Timer window;
  
  window.move(300, 300);
  window.resize(150, 100);
  window.setWindowTitle("Timer");
  window.show();

  return app.exec();
}
Main file.
Timer
Figure: Timer
This chapter was dedicated to events and signals in Qt4.

Layout management in Qt4

In this part of the Qt4 programming tutorial, we will talk about the layout management of widgets.
A typical application consists of various widgets. Those widgets are placed inside layouts. A programmer must manage the layout of the application. In Qt4 programming library we have two options.
  • absolute positioning
  • layouts

Absolute Positioning

The programmer specifies the position and the size of each widget in pixels. When you use absolute positioning, you have to understand several things.
  • the size and the position of a widget do not change, if you resize a window
  • applications look different (often crappy) on various platforms
  • changing fonts in your application might spoil the layout
  • if you decide to change your layout, you must completely redo your layout, which is tedious and time consuming
There might be situations, where we can possibly use absolute positioning. For example, this tutorial. We do not want to make the examples too difficult, so we often use absolute positioning to explain a topic. But mostly, in real world programs, programmers use layouts.
absolute.cpp
#include <QApplication>
#include <QDesktopWidget>
#include <QTextEdit>


class Absolute : public QWidget
{
 public:
     Absolute(QWidget *parent = 0);
};


Absolute::Absolute(QWidget *parent)
    : QWidget(parent)
{
  QTextEdit *edit = new QTextEdit(this);
  edit->setGeometry(5, 5, 200, 150);
}

int main(int argc, char *argv[])
{
  QApplication app(argc, argv);

  Absolute window;

  window.setWindowTitle("Absolute");
  window.show();

  return app.exec();
}
The setGeometry() method is used to position the widget on the window in absolute coordinates.
QTextEdit *edit = new QTextEdit(this);
edit->setGeometry(5, 5, 200, 150);
We create a QTextEdit widget and manually position it. The setGeometry() method does two things. It positions the widget to absolute coordinates and resizes the widget.
Before resizement
Figure: before resizement

After resizement
Figure: after resizement

QVBoxLayout

The QVBoxLayout class lines up widgets vertically. The widgets are added to the layout using the addWidget() method.
verticalbox.h
#pragma once

#include <QWidget>

class VerticalBox : public QWidget
{
  public:
    VerticalBox(QWidget *parent = 0);

};
The header file.
verticalbox.cpp
#include <QVBoxLayout>
#include <QPushButton>
#include "verticalbox.h"

VerticalBox::VerticalBox(QWidget *parent)
    : QWidget(parent)
{
  QVBoxLayout *vbox = new QVBoxLayout(this);
  vbox->setSpacing(1);

  QPushButton *settings = new QPushButton("Settings", this);
  settings->setSizePolicy(QSizePolicy::Expanding, 
      QSizePolicy::Expanding);
  QPushButton *accounts = new QPushButton("Accounts", this);
  accounts->setSizePolicy(QSizePolicy::Expanding, 
      QSizePolicy::Expanding);
  QPushButton *loans = new QPushButton("Loans", this);
  loans->setSizePolicy(QSizePolicy::Expanding, 
      QSizePolicy::Expanding);
  QPushButton *cash = new QPushButton("Cash", this);
  cash->setSizePolicy(QSizePolicy::Expanding, 
      QSizePolicy::Expanding);
  QPushButton *debts = new QPushButton("Debts", this);
  debts->setSizePolicy(QSizePolicy::Expanding, 
      QSizePolicy::Expanding);

  vbox->addWidget(settings);
  vbox->addWidget(accounts);
  vbox->addWidget(loans);
  vbox->addWidget(cash);
  vbox->addWidget(debts);

  setLayout(vbox);
}
In our example, we have one vertical layout manager. We put five buttons into it. We make all buttons expandable in both directions.
QVBoxLayout *vbox = new QVBoxLayout(this);
vbox->setSpacing(1);
We create the QVBoxLayout and set 1px spacing among child widgets.
QPushButton *settings = new QPushButton("Settings", this);
settings->setSizePolicy(QSizePolicy::Expanding, 
   QSizePolicy::Expanding);
We create a button and set a size policy for it. The child widgets are managed by the layout manager. By default, the button is expanded horizontally and has a fixed size vertically. If we want to change it, we set a new size policy. In our case, the button is expandable into both directions.
vbox->addWidget(settings);
vbox->addWidget(accounts);
vbox->addWidget(loans);
vbox->addWidget(cash);
vbox->addWidget(debts);
We add the child widgets to the layout manager.
setLayout(vbox);
We set the QVBoxLayout manager for the window.
main.cpp
#include <QApplication>
#include "verticalbox.h"

int main(int argc, char *argv[])
{
  QApplication app(argc, argv); 

  VerticalBox window;

  window.resize(240, 230);
  window.move(300, 300);
  window.setWindowTitle("VerticalBox");
  window.show();
  
  return app.exec();
}
Main file.
QVBoxLayout
Figure: QVBoxLayout

Buttons

In the following example, we display two buttons on the client area of the window. They will be positioned in the right bottom corner of the window.
buttons.h
#pragma once

#include <QWidget>
#include <QPushButton>

class Buttons : public QWidget
{
  public:
    Buttons(QWidget *parent = 0);

  private:
    QPushButton *ok;
    QPushButton *apply;

};
Header file.
buttons.cpp
#include <QVBoxLayout>
#include <QHBoxLayout>
#include "buttons.h"

Buttons::Buttons(QWidget *parent)
    : QWidget(parent)
{
  QVBoxLayout *vbox = new QVBoxLayout(this);
  QHBoxLayout *hbox = new QHBoxLayout();

  ok = new QPushButton("OK", this);
  apply = new QPushButton("Apply", this);

  hbox->addWidget(ok, 1, Qt::AlignRight);
  hbox->addWidget(apply, 0, Qt::AlignRight);

  vbox->addStretch(1);
  vbox->addLayout(hbox);
}
Say we wanted to have two buttons in the right bottom corner of the window.
QVBoxLayout *vbox = new QVBoxLayout(this);
QHBoxLayout *hbox = new QHBoxLayout();
We create two box layout managers. One vertical and one horizontal box layout manager.
ok = new QPushButton("OK", this);
apply = new QPushButton("Apply", this);
We create two buttons.
hbox->addWidget(ok, 1, Qt::AlignRight);
hbox->addWidget(apply, 0, Qt::AlignRight);
The buttons are placed inside the horizontal layout manager. These buttons are right aligned. We use the addWidget() method. The first parameter is the child widget. The second parameter is the stretch factor and the last parameter is alignment. By setting the stretch factor to 1 for the ok button, we give it space from the left side to the right side of the window. The widget does not expand to all space alloted to it. Finally, the Qt::AlignRight constant aligns the widget to the right of the allotted space. We also right aligned the apply button, but it was not necessary. The ok button already pushes the apply button to the right.
vbox->addStretch(1);
vbox->addLayout(hbox);
We put an empty, expandable space into the vertical box by calling the addStretch() method. Then we add the horizontal box layout to the vertical box layout.
main.cpp
#include <QApplication>
#include "buttons.h"

int main(int argc, char *argv[])
{
  QApplication app(argc, argv);  

  Buttons window;

  window.resize(290, 170);
  window.move(300, 300);  
  window.setWindowTitle("Buttons");
  window.show();
  
  return app.exec();
}
Main file.
Buttons
Figure: Buttons

Nesting layouts

The idea of the following example is to show that layout managers can be combined. By combination of even simple layouts we can create sophisticated dialogs or windows. To nest layouts, we utilize the addLayout() method.
layouts.h
#pragma once

#include <QWidget>

class Layouts : public QWidget
{
  public:
    Layouts(QWidget *parent = 0);

};
Header file.
layouts.cpp
#include <QVBoxLayout>
#include <QPushButton>
#include <QListWidget>
#include "layouts.h"

Layouts::Layouts(QWidget *parent)
    : QWidget(parent)
{

  QVBoxLayout *vbox = new QVBoxLayout();
  QHBoxLayout *hbox = new QHBoxLayout(this);

  QListWidget *lw = new QListWidget(this);
  lw->addItem("The Omen"); 
  lw->addItem("The Exorcist");
  lw->addItem("Notes on a scandal");
  lw->addItem("Fargo");
  lw->addItem("Capote");

  QPushButton *add = new QPushButton("Add", this);
  QPushButton *rename = new QPushButton("Rename", this);
  QPushButton *remove = new QPushButton("Remove", this);
  QPushButton *removeall = new QPushButton("Remove All", this);

  vbox->setSpacing(3);
  vbox->addStretch(1);
  vbox->addWidget(add);
  vbox->addWidget(rename);
  vbox->addWidget(remove);
  vbox->addWidget(removeall);
  vbox->addStretch(1);

  hbox->addWidget(lw);
  hbox->addSpacing(15);
  hbox->addLayout(vbox);

  setLayout(hbox);
}
In the example, we create a window that consists of four buttons and one list widget. The buttons are grouped in a vertical column and placed to the right of the list widget. If we resize the window, the list widget is being resized as well.
QVBoxLayout *vbox = new QVBoxLayout();
The QVBoxLayout will be the column for the buttons.
QHBoxLayout *hbox = new QHBoxLayout(this);
The QHBoxLayout will be the base layout for our widgets.
QListWidget *lw = new QListWidget(this);
lw->addItem("The Omen"); 
lw->addItem("The Exorcist");
lw->addItem("Notes on a scandal");
lw->addItem("Fargo");
lw->addItem("Capote");
Here we create the list widget.
QPushButton *add = new QPushButton("Add", this);
QPushButton *rename = new QPushButton("Rename", this);
QPushButton *remove = new QPushButton("Remove", this);
QPushButton *removeall = new QPushButton("Remove All", this);
Here we create our four buttons.
vbox->setSpacing(3);
vbox->addStretch(1);
vbox->addWidget(add);
vbox->addWidget(rename);
vbox->addWidget(remove);
vbox->addWidget(removeall);
vbox->addStretch(1);
The vertical box with four buttons is created. We put some little space among our buttons. Notice that we add a stretch factor to the top and to the bottom of the vertical box. This way, the buttons are vertically centered.
hbox->addWidget(lw);
hbox->addSpacing(15);
hbox->addLayout(vbox);
The list widget and the vertical box of buttons are placed into the horizontal box layout. The addLayout() method is used to add a layout to another layout.
setLayout(hbox);
We set the base layout for the parent window.
main.cpp
#include <QApplication>
#include "layouts.h"

int main(int argc, char *argv[])
{
  QApplication app(argc, argv);  
    
  Layouts window;
  
  window.move(300, 300);
  window.setWindowTitle("Layouts");
  window.show();

  return app.exec();
}
Main file.
Layouts
Figure: Layouts

QGridLayout

The QGridLayout places its widgets in a grid. It is a very sophisticated and powerful layout. Every programmer should be familiar with this layout.
calculator.h
#pragma once

#include <QWidget>

class Calculator : public QWidget
{
  public:
    Calculator(QWidget *parent = 0);

};
Header file.
calculator.cpp
#include <QPushButton>
#include <QGridLayout>
#include "calculator.h"

Calculator::Calculator(QWidget *parent)
    : QWidget(parent)
{
  QGridLayout *grid = new QGridLayout(this);
  grid->setSpacing(2);

  QString values[16] = { "7", "8", "9", "/", 
    "4", "5", "6", "*",
    "1", "2", "3", "-",
    "0", ".", "=", "+"
  };

  int pos = 0;

  for (int i=0; i<4; i++) {
    for (int j=0; j<4; j++) {
      QPushButton *btn = new QPushButton(values[pos], this);
      btn->setFixedSize(40, 40);
      grid->addWidget(btn, i, j);
      pos++;
    }
  }

  setLayout(grid);
}
We create the skeleton of a calculator.
QGridLayout *grid = new QGridLayout(this);
grid->setSpacing(2);
We create the grid layout and set 2px space among child widgets.
QString values[16] = { "7", "8", "9", "/", 
  "4", "5", "6", "*",
  "1", "2", "3", "-",
  "0", ".", "=", "+"
};
These are the characters that will be displayed on the buttons.
for (int i=0; i<4; i++) {
 for (int j=0; j<4; j++) {
   QPushButton *btn = new QPushButton(values[pos], this);
   btn->setFixedSize(40, 40);
   grid->addWidget(btn, i, j);
   pos++;
 }
}
We place 16 widgets into the grid layout. Each of the buttons will have a fixed size.
main.cpp
#include <QApplication>
#include "calculator.h"

int main(int argc, char *argv[])
{
  QApplication app(argc, argv); 

  Calculator window;

  window.move(300, 300);
  window.setWindowTitle("Calculator");
  window.show();

  return app.exec();
}
Main file.
QGridLayout
Figure: QGridLayout

More complicated layout

In the last example of this chapter, we create a more complicated window using the QGridLayout manager.
karenina.h
#pragma once

#include <QWidget>

class Karenina : public QWidget
{
  public:
    Karenina(QWidget *parent = 0);

};
Header file.
karenina.cpp
#include <QGridLayout>
#include <QLabel>
#include <QLineEdit>
#include <QTextEdit>
#include "karenina.h"

Karenina::Karenina(QWidget *parent)
    : QWidget(parent)
{
  QGridLayout *grid = new QGridLayout(this);
  grid->setSpacing(20);

  QLabel *title = new QLabel("Title", this);
  grid->addWidget(title, 0, 0, 1, 1);

  QLineEdit *edt1 = new QLineEdit(this);
  grid->addWidget(edt1, 0, 1, 1, 1);

  QLabel *author = new QLabel("Author", this);
  grid->addWidget(author, 1, 0, 1, 1);

  QLineEdit *edt2 = new QLineEdit(this);
  grid->addWidget(edt2, 1, 1, 1, 1);

  QLabel *review = new QLabel("Review", this);
  grid->addWidget(review, 2, 0, 1, 1);

  QTextEdit *te = new QTextEdit(this);
  grid->addWidget(te, 2, 1, 3, 1);

  setLayout(grid);
}
The code creates a window, which could be used to enter a author, title and a review for a book.
QGridLayout *grid = new QGridLayout(this);
grid->setSpacing(20);
We create a grid layout and set some spacing.
QLabel *title = new QLabel("Title", this);
grid->addWidget(title, 0, 0, 1, 1);
These code lines create a label widget and place it into the grid layout. The addWidget() method has five parameters. The first parameter is the child widget. A label in our case. The next two parameters are the row and column in the grid, where we place the label. Finally, the last parameters are the rowspan and the colspan. These parameter specify, how many rows the current widget will span. In our case, the label will span only one column and one row.
QTextEdit *te = new QTextEdit(this);
grid->addWidget(te, 2, 1, 3, 1);
The QTextEdit widget is placed into the third row, second column. It spans three rows and one column.
main.cpp
#include <QApplication>
#include "karenina.h"

int main(int argc, char *argv[])
{
  QApplication app(argc, argv);  

  Karenina window;

  window.move(300, 300);
  window.setWindowTitle("Anna Karenina");
  window.show();

  return app.exec();
}
Main file.
Karenina
Figure: Karenina
This part of the Qt4 tutorial was dedicated to layout management.