In this part of the Qt4 programming tutorial, we will talk about the layout
management of widgets.
A typical application consists of various widgets. Those widgets are placed inside layouts. A programmer must manage the layout of the application. In Qt4 programming library we have two options.


A typical application consists of various widgets. Those widgets are placed inside layouts. A programmer must manage the layout of the application. In Qt4 programming library we have two options.
- absolute positioning
- layouts
Absolute Positioning
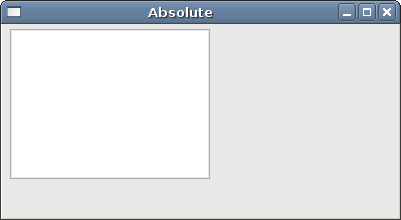
The programmer specifies the position and the size of each widget in pixels. When you use absolute positioning, you have to understand several things.- the size and the position of a widget do not change, if you resize a window
- applications look different (often crappy) on various platforms
- changing fonts in your application might spoil the layout
- if you decide to change your layout, you must completely redo your layout, which is tedious and time consuming
absolute.cpp
#include <QApplication>
#include <QDesktopWidget>
#include <QTextEdit>


class Absolute : public QWidget
{
 public:
     Absolute(QWidget *parent = 0);
};


Absolute::Absolute(QWidget *parent)
    : QWidget(parent)
{
  QTextEdit *edit = new QTextEdit(this);
  edit->setGeometry(5, 5, 200, 150);
}

int main(int argc, char *argv[])
{
  QApplication app(argc, argv);

  Absolute window;

  window.setWindowTitle("Absolute");
  window.show();

  return app.exec();
}
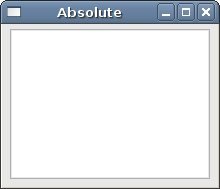
The setGeometry() method is used to position the widget on the
window in absolute coordinates.
QTextEdit *edit = new QTextEdit(this);
edit->setGeometry(5, 5, 200, 150);
We create a
QTextEdit widget and manually position it. The
setGeometry() method does two things. It positions the widget to
absolute coordinates and resizes the widget.
Figure: before resizement
Figure: after resizement
QVBoxLayout
TheQVBoxLayout class lines up widgets vertically. The widgets are
added to the layout using the addWidget() method.
verticalbox.h
#pragma once

#include <QWidget>

class VerticalBox : public QWidget
{
  public:
    VerticalBox(QWidget *parent = 0);

};
The header file.
verticalbox.cpp
#include <QVBoxLayout>
#include <QPushButton>
#include "verticalbox.h"

VerticalBox::VerticalBox(QWidget *parent)
    : QWidget(parent)
{
  QVBoxLayout *vbox = new QVBoxLayout(this);
  vbox->setSpacing(1);

  QPushButton *settings = new QPushButton("Settings", this);
  settings->setSizePolicy(QSizePolicy::Expanding,
      QSizePolicy::Expanding);
  QPushButton *accounts = new QPushButton("Accounts", this);
  accounts->setSizePolicy(QSizePolicy::Expanding,
      QSizePolicy::Expanding);
  QPushButton *loans = new QPushButton("Loans", this);
  loans->setSizePolicy(QSizePolicy::Expanding,
      QSizePolicy::Expanding);
  QPushButton *cash = new QPushButton("Cash", this);
  cash->setSizePolicy(QSizePolicy::Expanding,
      QSizePolicy::Expanding);
  QPushButton *debts = new QPushButton("Debts", this);
  debts->setSizePolicy(QSizePolicy::Expanding,
      QSizePolicy::Expanding);

  vbox->addWidget(settings);
  vbox->addWidget(accounts);
  vbox->addWidget(loans);
  vbox->addWidget(cash);
  vbox->addWidget(debts);

  setLayout(vbox);
}
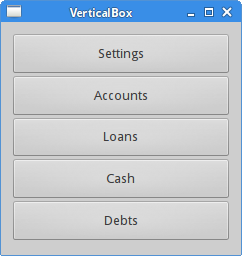
In our example, we have one vertical layout manager. We put five buttons
into it. We make all buttons expandable in both directions.
QVBoxLayout *vbox = new QVBoxLayout(this);
vbox->setSpacing(1);
We create the
QVBoxLayout and set 1px spacing among
child widgets.
QPushButton *settings = new QPushButton("Settings", this);
settings->setSizePolicy(QSizePolicy::Expanding,
   QSizePolicy::Expanding);
We create a button and set a size policy for it. The child widgets are managed
by the layout manager. By default, the button is expanded horizontally and has a
fixed size vertically. If we want to change it, we set a new size policy. In our
case, the button is expandable into both directions.
vbox->addWidget(settings);
vbox->addWidget(accounts);
vbox->addWidget(loans);
vbox->addWidget(cash);
vbox->addWidget(debts);
We add the child widgets to the layout manager.
setLayout(vbox);We set the
QVBoxLayout manager for the window.
main.cpp
#include <QApplication>
#include "verticalbox.h"

int main(int argc, char *argv[])
{
  QApplication app(argc, argv);

  VerticalBox window;

  window.resize(240, 230);
  window.move(300, 300);
  window.setWindowTitle("VerticalBox");
  window.show();

  return app.exec();
}
Main file.
Figure: QVBoxLayout
Buttons
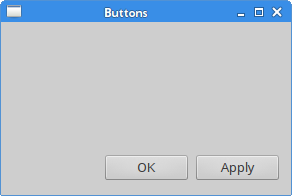
In the following example, we display two buttons on the client area of the window. They will be positioned in the right bottom corner of the window.
buttons.h
#pragma once

#include <QWidget>
#include <QPushButton>

class Buttons : public QWidget
{
  public:
    Buttons(QWidget *parent = 0);

  private:
    QPushButton *ok;
    QPushButton *apply;

};
Header file.
buttons.cpp
#include <QVBoxLayout>
#include <QHBoxLayout>
#include "buttons.h"

Buttons::Buttons(QWidget *parent)
    : QWidget(parent)
{
  QVBoxLayout *vbox = new QVBoxLayout(this);
  QHBoxLayout *hbox = new QHBoxLayout();

  ok = new QPushButton("OK", this);
  apply = new QPushButton("Apply", this);

  hbox->addWidget(ok, 1, Qt::AlignRight);
  hbox->addWidget(apply, 0, Qt::AlignRight);

  vbox->addStretch(1);
  vbox->addLayout(hbox);
}
Say we wanted to have two buttons in the right bottom corner of the window.
QVBoxLayout *vbox = new QVBoxLayout(this);
QHBoxLayout *hbox = new QHBoxLayout();
We create two box layout managers. One vertical and one horizontal box layout manager.
ok = new QPushButton("OK", this);
apply = new QPushButton("Apply", this);
We create two buttons.
hbox->addWidget(ok, 1, Qt::AlignRight);
hbox->addWidget(apply, 0, Qt::AlignRight);
The buttons are placed inside the horizontal layout manager. These buttons are right aligned. We use the
addWidget() method. The first parameter
is the child widget. The second parameter is the stretch factor and the last
parameter is alignment. By setting the stretch factor to 1 for the ok button, we
give it space from the left side to the right side of the window. The widget
does not expand to all space alloted to it. Finally, the
Qt::AlignRight constant aligns the widget to the right of the
allotted space. We also right aligned the apply button, but it was not
necessary. The ok button already pushes the apply button to the right.
vbox->addStretch(1);
vbox->addLayout(hbox);
We put an empty, expandable space into the vertical box by calling the
addStretch() method. Then we add the horizontal box layout to the
vertical box layout.
main.cpp
#include <QApplication>
#include "buttons.h"

int main(int argc, char *argv[])
{
  QApplication app(argc, argv);

  Buttons window;

  window.resize(290, 170);
  window.move(300, 300);
  window.setWindowTitle("Buttons");
  window.show();

  return app.exec();
}
Main file.
Figure: Buttons
Nesting layouts
The idea of the following example is to show that layout managers can be combined. By combination of even simple layouts we can create sophisticated dialogs or windows. To nest layouts, we utilize theaddLayout()
method.
layouts.h
#pragma once

#include <QWidget>

class Layouts : public QWidget
{
  public:
    Layouts(QWidget *parent = 0);

};
Header file.
layouts.cpp
#include <QVBoxLayout>
#include <QPushButton>
#include <QListWidget>
#include "layouts.h"

Layouts::Layouts(QWidget *parent)
    : QWidget(parent)
{

  QVBoxLayout *vbox = new QVBoxLayout();
  QHBoxLayout *hbox = new QHBoxLayout(this);

  QListWidget *lw = new QListWidget(this);
  lw->addItem("The Omen");
  lw->addItem("The Exorcist");
  lw->addItem("Notes on a scandal");
  lw->addItem("Fargo");
  lw->addItem("Capote");

  QPushButton *add = new QPushButton("Add", this);
  QPushButton *rename = new QPushButton("Rename", this);
  QPushButton *remove = new QPushButton("Remove", this);
  QPushButton *removeall = new QPushButton("Remove All", this);

  vbox->setSpacing(3);
  vbox->addStretch(1);
  vbox->addWidget(add);
  vbox->addWidget(rename);
  vbox->addWidget(remove);
  vbox->addWidget(removeall);
  vbox->addStretch(1);

  hbox->addWidget(lw);
  hbox->addSpacing(15);
  hbox->addLayout(vbox);

  setLayout(hbox);
}
In the example, we create a window that consists of four buttons and one list
widget. The buttons are grouped in a vertical column and placed to the right of
the list widget. If we resize the window, the list widget is being resized as
well.
QVBoxLayout *vbox = new QVBoxLayout();The
QVBoxLayout will be the column for the buttons.
QHBoxLayout *hbox = new QHBoxLayout(this);The
QHBoxLayout will be the base layout for our widgets.
QListWidget *lw = new QListWidget(this);
lw->addItem("The Omen");
lw->addItem("The Exorcist");
lw->addItem("Notes on a scandal");
lw->addItem("Fargo");
lw->addItem("Capote");
Here we create the list widget.
QPushButton *add = new QPushButton("Add", this);
QPushButton *rename = new QPushButton("Rename", this);
QPushButton *remove = new QPushButton("Remove", this);
QPushButton *removeall = new QPushButton("Remove All", this);
Here we create our four buttons.
vbox->setSpacing(3);
vbox->addStretch(1);
vbox->addWidget(add);
vbox->addWidget(rename);
vbox->addWidget(remove);
vbox->addWidget(removeall);
vbox->addStretch(1);
The vertical box with four buttons is created. We put some little space among our buttons. Notice that we add a stretch factor to the top and to the bottom of the vertical box. This way, the buttons are vertically centered.
hbox->addWidget(lw);
hbox->addSpacing(15);
hbox->addLayout(vbox);
The list widget and the vertical box of buttons are placed into the horizontal box layout. The
addLayout() method is used to add a layout to
another layout.
setLayout(hbox);We set the base layout for the parent window.
main.cpp
#include <QApplication>
#include "layouts.h"

int main(int argc, char *argv[])
{
  QApplication app(argc, argv);

  Layouts window;

  window.move(300, 300);
  window.setWindowTitle("Layouts");
  window.show();

  return app.exec();
}
Main file.
Figure: Layouts
QGridLayout
TheQGridLayout places its widgets in a grid. It is a very
sophisticated and powerful layout. Every programmer should be familiar with this
layout.
calculator.h
#pragma once

#include <QWidget>

class Calculator : public QWidget
{
  public:
    Calculator(QWidget *parent = 0);

};
Header file.
calculator.cpp
#include <QPushButton>
#include <QGridLayout>
#include "calculator.h"

Calculator::Calculator(QWidget *parent)
    : QWidget(parent)
{
  QGridLayout *grid = new QGridLayout(this);
  grid->setSpacing(2);

  QString values[16] = { "7", "8", "9", "/",
    "4", "5", "6", "*",
    "1", "2", "3", "-",
    "0", ".", "=", "+"
  };

  int pos = 0;

  for (int i=0; i<4; i++) {
    for (int j=0; j<4; j++) {
      QPushButton *btn = new QPushButton(values[pos], this);
      btn->setFixedSize(40, 40);
      grid->addWidget(btn, i, j);
      pos++;
    }
  }

  setLayout(grid);
}
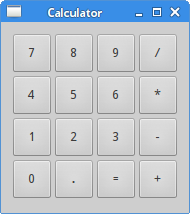
We create the skeleton of a calculator.
QGridLayout *grid = new QGridLayout(this);
grid->setSpacing(2);
We create the grid layout and set 2px space among child widgets.
QString values[16] = { "7", "8", "9", "/",
  "4", "5", "6", "*",
  "1", "2", "3", "-",
  "0", ".", "=", "+"
};
These are the characters that will be displayed on the buttons.
for (int i=0; i<4; i++) {
 for (int j=0; j<4; j++) {
   QPushButton *btn = new QPushButton(values[pos], this);
   btn->setFixedSize(40, 40);
   grid->addWidget(btn, i, j);
   pos++;
 }
}
We place 16 widgets into the grid layout. Each of the buttons will have a
fixed size.
main.cpp
#include <QApplication>
#include "calculator.h"

int main(int argc, char *argv[])
{
  QApplication app(argc, argv);

  Calculator window;

  window.move(300, 300);
  window.setWindowTitle("Calculator");
  window.show();

  return app.exec();
}
Main file.
Figure: QGridLayout
More complicated layout
In the last example of this chapter, we create a more complicated window using theQGridLayout manager.
karenina.h
#pragma once

#include <QWidget>

class Karenina : public QWidget
{
  public:
    Karenina(QWidget *parent = 0);

};
Header file.
karenina.cpp
#include <QGridLayout>
#include <QLabel>
#include <QLineEdit>
#include <QTextEdit>
#include "karenina.h"

Karenina::Karenina(QWidget *parent)
    : QWidget(parent)
{
  QGridLayout *grid = new QGridLayout(this);
  grid->setSpacing(20);

  QLabel *title = new QLabel("Title", this);
  grid->addWidget(title, 0, 0, 1, 1);

  QLineEdit *edt1 = new QLineEdit(this);
  grid->addWidget(edt1, 0, 1, 1, 1);

  QLabel *author = new QLabel("Author", this);
  grid->addWidget(author, 1, 0, 1, 1);

  QLineEdit *edt2 = new QLineEdit(this);
  grid->addWidget(edt2, 1, 1, 1, 1);

  QLabel *review = new QLabel("Review", this);
  grid->addWidget(review, 2, 0, 1, 1);

  QTextEdit *te = new QTextEdit(this);
  grid->addWidget(te, 2, 1, 3, 1);

  setLayout(grid);
}
The code creates a window, which could be used to enter a author,
title and a review for a book.
QGridLayout *grid = new QGridLayout(this);
grid->setSpacing(20);
We create a grid layout and set some spacing.
QLabel *title = new QLabel("Title", this);
grid->addWidget(title, 0, 0, 1, 1);
These code lines create a label widget and place it into the grid layout.
The addWidget() method has five parameters. The
first parameter is the child widget. A label in our case. The next two
parameters are the row and column in the grid, where we place the label.
Finally, the last parameters are the rowspan and the colspan. These parameter
specify, how many rows the current widget will span.
In our case, the label will span only one column and one row.
QTextEdit *te = new QTextEdit(this);
grid->addWidget(te, 2, 1, 3, 1);
The
QTextEdit widget is placed into the third row, second column.
It spans three rows and one column.
main.cpp
#include <QApplication>
#include "karenina.h"

int main(int argc, char *argv[])
{
  QApplication app(argc, argv);

  Karenina window;

  window.move(300, 300);
  window.setWindowTitle("Anna Karenina");
  window.show();

  return app.exec();
}
Main file.
Figure: Karenina
This part of the Qt4 tutorial was dedicated to layout management.
No comments:
Post a Comment